Tips for the Secondary Hybrid Schedule

Now that P-CCS  is bringing middle school and high school students back on-campus, teachers may wish to further adjust their instruction for optimized learning with the new schedule. The hybrid schedule feels very unique to the times we are living in. Fortunately, schools across the country have been using it and teachers have insights to share. For this post, I have borrowed mostly from the work of Jennifer Gonzalez (Cult of Pedagogy) and Catlin Tucker, an experienced, blended learning coach. Consider reading the original posts for more information.

Four Models:

  1. Station Rotation: Think of your week or class period in 3 kinds of “stations” for students to rotate through: teacher-led, online activity, and an offline activity. Here’s a great template from Stephanie DeMichele. Here’s a link to some specific ideas for core content areas.
  2. Flipped Learning: Move the act of talking at students to asynchronous video so it can be more accessible for all (pause, re-watch, captions). Think of your week or class period in terms of a pre-video activity, during-the-video activity, and a post-video activity. If you desire, save time, by recording snippets of intended instruction during your live class to post in Canvas, directions here.
  3. Playlist Model: Playlists allow students to move through a sequence of learning activities. The playlist can build in choice as far as what modality and what combination of activities students choose. This model is also very similar to a hyperdoc which guides students through a complete lesson flow. In this model, teachers design the lesson in-advance and then spend time in class connecting with individuals and small groups to answer questions, clear misconceptions, and provide feedback.
  4. Pre/In/Post Class: This model simply helps you think about planning in terms of synchronous and asynchronous. Utilize Sections in Canvas to divide your class into cohorts so that each one sees their work at the appropriate time. See the graphic below from Catlin Tucker’s blog.
Ideas for pre, in, and post class work.
Graphic created by Catlin Tucker. Click the image to view the post.

Tips from Teachers (curated from Jennifer Gonzalez of Cult of Pedagogy)

  • Make the face-to-face time special–Try not to use this time to give all your tests or “cram” in all the content you plan to deliver. Use it build relationships and interact with each other.
    • Putting direct instruction on video prevents you from having to repeat yourself over and over and allows students to watch at their own pace
  • Chunk the time–As we move to the block schedule on top of the hybrid set-up it is helpful think of your time in various segments. You can select one of the models above to guide you. If you desire to have the at-home cohort log-on to your synchronous class time you might consider some of these models. They were shared by Beth Alexander, the Director of Teaching and Learning at a school in Toronto.
  • Build community–This is always important and still is as teachers and students face this new classroom set-up.

Teachers can continue to use Canvas and other tech tools to manage and organize their courses. Reach out to a Tech Integration Specialist if you want a thought partner in this process. Submit a tech ticket and select the “Tech Integration” option.

If you are looking for more ideas, check out this collection of resources: https://wke.lt/w/s/N62hdh


Managing Your Modules

Anyone with a year-long course (or 100+ modules), might be noticing that is takes quite a long time for all your modules to load. Students and families may also be experiencing this lag when they click the link for their daily work module. To help save time and frustration we recommend that you free up some space in one of two ways:

  1. Unpublish modules from early in the school year. Image of "unpublish" icon
  2. If you or your students are still experiencing a slow down, you can copy the module to your Sandbox course and then delete it from your main course.

Image of steps to copy and delete modules

Updating the Zoom App

Keep calm and update zoom

In order to get the most out of our Zoom experience, it is important to update the app. An out-of-date Zoom app may lead to sound or other technical issues. Additionally, Zoom has recently pushed out live captioning and the ability to allow co-hosts to set up breakout rooms. These features don’t appear unless you are running the latest version of the Zoom app. Chromebook users or any device that used the mobile app should be getting these updates automatically. If you are using the desktop client/software on a school-issued HP Probook, a Windows, or Mac device you will need to update manually.

Next Wednesday afternoon, February 10 17th (rescheduled to avoid any possible, but unlikely conflict due to it being Count Day), the district will activate a prompt so that when you open the Zoom app, if it can be updated to a newer version, you will be required to update it. Before any meeting you might have, please give yourself a few extra minutes to take care of that update by launching the app earlier than you might otherwise. And be advised that students may run a little late if they launch the app and find they are being prompted to update. To avoid any issues you can always check for updates at a time that is most convenient for you.

Helpful Tip: Zoom automatically signs you out of your account fairly often. If you notice your thumbnail picture is not showing or your virtual background is missing, you may want to relaunch the Zoom app and make sure that you are signed into the app and not just the Zoom website.

Use Sections to Manage Green/Blue Cohorts

Image of finished sections

Sections allow you to subdivide students within a course. It allows you to set different due dates for assignments, quizzes, and discussions. This is ideal for managing the Blue and Green Cohorts in the hybrid schedule.

Set up Groups

First go to Settings from the Course Navigation menu and you’ll find a tab entitled “Sections.” You can add and name your sections however you wish.

Here’s what you might have for your classes, the sections will be ordered alphabetically:

Image of finished sections

Add Students to Sections

Click on “People” in the Course Navigation menu to add students to the proper section.

Visual of steps to add people to sections

A pop-up will appear and you can start typing the name of the cohort and it will appear for you to select or you can click “browse” and the options will appear.

Image of editing section enrollments

Do this for each user. When finished you’ll be able to see which cohort/section each user is in.

Image of cohorts denoted in roster

You can remove the section following the same grading process.

Assignments for Sections

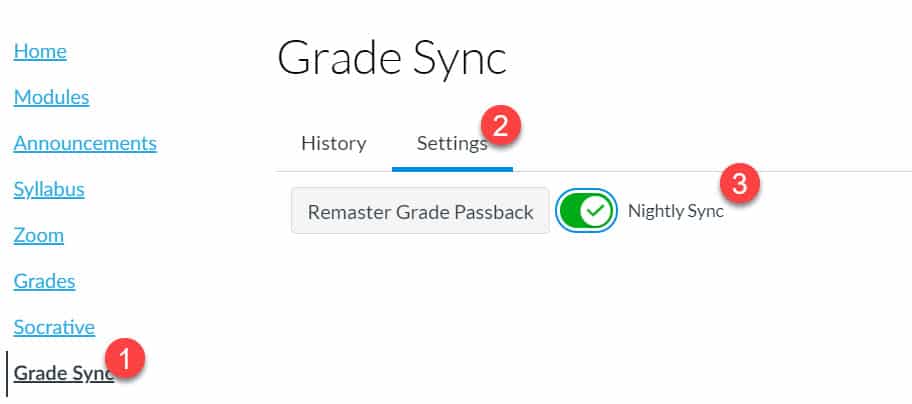
For the purpose of syncing with MiStar, it is very important you ensure one of the “Assign to” groups is listed as “Everyone”
or “Everyone Else.” Do not assign to Blue Cohort and Green Cohort, grading sync will not work.

Image indicating use of everyone or everyone else


Manage Your Inbox with Filters

Click the "Create Filter button

Our email inboxes can become quite difficult to manage, creating a filter is a great way to clear the clutter without removing important messages that we may need to access later. For example, you may get LMS notifications that you want to filter to a specific place.  Follow these steps to help your inbox manage itself using filter rules.

Suppose you get Exit Ticket response emails. You want to move them all to one folder (Gmail calls them labels) to view all at one time.

Inbox snapshot
You may receive several notifications from Google Forms that you want to create a filter for.

It is best to identify the sender and/or subject of these emails to type into the Search bar. You’ll do an advanced search, so click the drop-down arrow.

Shot of search bar and more option drop-down arrow

Add as much information as possible to ensure you get the right messages filtered. Then click, “Create Filter.”

Click the "Create Filter button

Select any filter rules you see as appropriate for that kind of message. You should apply the appropriate Label (or Create one). You may also want to select “Skip the Inbox.” If the case, rest assured, archived emails in Gmail are not deleted permanently after 30 days. They are permanently stored in your email (and now labelled) until you delete/trash it.

Image of filter menuYou can always remove or edit your filter in Setting by clicking on the wrench icon in the upper-right corner.

shot of filter settings in Gmail

When you are ready to view the filtered emails, access the Label on the left-side menu.

image of inbox label

Build Community through Games and Play

snapshot of playmeo website

In the next few weeks we will be welcoming students back into our buildings. This will be a very exciting time and it will be important to help students feel at ease and games can be a great way to do that. If you are looking for fresh ideas for group activities and games, the Playmeo website is a great resource.

Many activities are free and you can search by learning theme, program outcome, or activity type. Additionally, you can sort by group size and how much time you have for the activity.snapshot of playmeo website

Closed Captions Zoom Update

enable captions in zoom

Closed captions are an essential accessibility tool for people who are deaf or hard of hearing (and for people with other conditions as well). Captioning is also a useful feature for many students as an additional representation of information in a virtual setting. Previously in Zoom, closed captioning was only available from third party providers or by assigning someone to type captions. Now automatic, live transcription of closed captions is an available feature in the Zoom desktop client (not the Chrome browser application). Once enabled, this automatically adds text to the bottom of the video with what the host and others are saying. Please note however, live transcription does not work in breakout rooms, only within the main session.

Zoom captions screenshot
The option to turn on Closed Captioning is in the Zoom toolbar (it may be under “More” depending on window size).

When closed captioning is enabled, as the host you will see the live-transcript below your video, but they DO NOT automatically appear for your participants. Instead, participants will receive a notification and must click the “Closed Caption” option in the menu bar (and usually click Show Subtitle) to start viewing the captions.  Once they have done so, the size of the captions can be adjusted under “Accessibility” in the video settings.

screenshot of adjusting caption font size
Adjust font size in “Video Settings,” under “Accessibility.”

Elaborating on the CC options:

  • Show Subtitles – Displays captioning on the bottom of the video. You can also select Hide Subtitle once subtitles are selected to hide them.
  • View Full Transcript – Opens a panel/pop-up and displays captions in real-time with both the speaker’s name and time stamp. In that pop-up, participants will also see a button to save the transcript (this button might not be available if the host has disabled this functionality). If enabled, click Save Transcript. A copy of the transcript as a .txt file will be downloaded to your machine.
           Note: Transcripts save up to the moment when you click Save Transcript. If you click Save Transcript multiple times throughout the event, it will overwrite/update the existing file. We recommend clicking Save Transcript just before the meeting ends to ensure you have the transcript from the entire meeting. There is no option to auto-save these transcripts.

Bear in mind:

  • Speak slowly, it will help the system capture the words you are saying
  • If there are any loud disruptions (i.e. cars outside or school bells) pause and hold your thoughts until the noise passes.

If you are hosting a meeting with live-transcription, we recommend making a comment at the beginning of your meeting informing your meeting participants that live-transcription is available and a note about how to enable them. Encourage all your students to try turning the captions on to see if it has an impact on their comprehension or capacity to pay attention.  Make it a best UDL (Universal Design for Learning) practice to enable closed captioning during all of your meetings.

For more information on UDL and closed captioning, please read this article.


Second Semester Transition for Canvas

With the start of the 2nd semester arriving soon, we’d like to again provide step by step directions (please see below) for those teachers interested in transferring content from one Canvas course to another. We shared similar directions covering the export/import process at the outset of our school year to assist teachers in migrating content out of courses they had created and built in to the MISTAR-rostered course shells that appeared in their accounts.

  1. Step-By-Step Directions with Pictures on how to export content from old course and import it into the new course
  2. Step-By-Step Video (Screencast) Directions

Bulk adjusting due dates and times:

*Please note that canvas exports do not include backups of student interactions and grades. Grades can be exported separately as CSV files.

**Year-long courses do not apply here. However, it is still good practice to make backups of your courses.

Below are some best practices when transferring content, this includes exporting your grades, settings, and downloading additional data.

Best Practice: Keep Sem 1 and Sem 2 clean and separate to have easier content management and processing. For those with a course that spans the year, consider just copying the last module or most recent content from your Semester 1 course into your Semester 2 course so that you are starting with an almost fresh course. (You can always have view access extended to the Semester 1 course so that students are able to review their past work at any time – unless you’d prefer to restrict access to that course content.)
You could also extend course dates in Semester 1 courses if you need students to have more time to participate/work in those courses, although you will need to bear in mind MISTAR grade submission deadlines.

Middle School Teachers – FYI, grading periods are being set in Canvas

Canvas grading periods

Over this weekend, the district will be updating Canvas with the dates of the grading periods for all of our middle school semester and year long courses. Consequently, starting Monday, middle school teachers will be able to filter their grade books, assignments’ list, and students’ grades pages by quarter instead of having to view all graded content from the entire semester or school year. When grading periods are enabled, the due date of assignment will determine the grading period within which the assignment will appear in the Gradebook. If no due date is set, the assignment defaults to the last grading period available for the course. Please further note, students will only have view-only access to first quarter course content and will be unable to submit work for assignments associated with the first quarter (Q1) since it is not the current grading period. Finally, while teachers can edit their previous term’s course content, they cannot make further adjustments in the feedback or grading of any non-current grading period submissions.

Importantly, while students will still find their definitive grades in MISTAR, this grade period demarcation will also result in a more accurate current grade average, as far as their Canvas grade is concerned, since only the current marking period will be reflected.

*Please note elementary and high school teachers — it is very conceivable that we will similarly update Canvas for courses that span grading periods too, in the coming weeks, to allow for term filtering.

Please find quick overview directions and screenshots in this document.