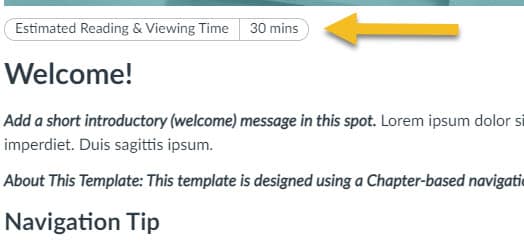
 When you enter into a task, it is helpful to know approximately how long something might take. Don Lourcey, on the Iredell-Statesville School District has gathered some code so that an estimated time to complete can be added to the top of your Canvas pages and assignments (see image sample above). This small step might be very useful for students and families working on your course at home and help the students in front of you to manage their attention level.
You can use this ReadTime website to help you estimate how long it might take for students to read the text on your page.
See the code below that can be copied and pasted into the HTML editor of your Canvas page. Change the “30 mins” as needed to reflect the estimated time (eg. “15 mins”, “20 minutes” or “1 hour”). A video tutorial is included at the bottom of this page.
Estimated Reading Time code
<ul class=”pill”>
<li>Estimated Reading Time</li>
<li>30 mins</li>
</ul>
<ul class=”pill”></ul>
Estimated Time to Complete code
<ul class=”pill”>
<li>Estimated Time to Complete</li>
<li>30 mins</li>
</ul>
<ul class=”pill”></ul>
Estimated Reading and Viewing Time code
<ul class=”pill”>
<li>Estimated Reading & Viewing Time</li>
<li>30 mins</li>
</ul>
<ul class=”pill”></ul>

