You might remember we first mentioned Google Vids on the tech blog back in December 2024 when it was first announced. Well, as part of our new “video toolkit” series, we wanted to dive back in and highlight this fantastic tool!
If you’ve ever finished a great Google Slides lesson and thought, “I wish I could turn this into a short, engaging video for review,” or you want your students to create digital projects that go beyond a slide deck, Vids is for you. It’s a simple, collaborative, and familiar app right in our Google Workspace.
What is Google Vids?
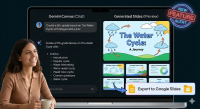
Think of Google Vids as the perfect mix between Google Slides and a simple video editor.
It lives right in your Google Drive and has a familiar, easy-to-use feel. But instead of creating static “slides,” you create dynamic “scenes” to build a video. You can add text, images, stock video clips, and even record your own voice or screen.
For many of us, this is a fantastic new option that simplifies our tech toolkit. If you’ve used Canvas Studio for quick recordings or screen-sharing, Vids is a powerful, built-in replacement. And for our middle school teachers (6-8), this is a great, collaborative alternative for the student projects you might have done in WeVideo, all living right inside our Google environment.
The best part? It’s collaborative, just like a Google Doc. You and your students can work on a video project together, all from the comfort of your Google account.
Classroom Applications
This is where Vids really shines. It’s not just another tool; it’s a new way to present information and a new way for students to show what they know.
A Quick Note on AI: You’ll see many options for AI-powered features like automatic video creation and AI voiceovers. Please note: most of these advanced AI features are not enabled on our district’s (P-CCS) account. But don’t worry! The core tools for recording, editing, and importing are incredibly powerful and easy to use.
New Feature Alert: Vids has recently added support for vertical (9:16) and square (1:1) video formats! This is a fantastic update for student projects, allowing them to create content that feels modern and engaging, just like the videos they see on platforms like YouTube Shorts or TikTok.
Here are a few ideas to get you started:
- Teacher Idea: The “Slide Deck Refresh”
- What it is: You have a great Google Slides presentation you use every year. Instead of just posting the slides, import them directly into Google Vids!
- How it works: Vids will turn each slide into a “scene.” You can then easily record your voice over each scene, explaining the key concepts. (A perfect replacement for a simple Canvas Studio recording!)
- Student Outcome: Creates a perfect, self-paced video lesson for flipped classrooms, absent students, or review before a test.
- Teacher Idea: The Weekly Recap Video
- What it is: Quickly create a 2-minute video for parents and students recapping the week’s highlights and previewing what’s next.
- How it works: Use a template, drop in a few photos from class activities, and record a quick, friendly voiceover.
- Student Outcome: Strengthens the home-school connection and keeps families engaged in a format they’re more likely to watch.
- Student Idea: The Video Book Trailer
- What it is: Instead of a traditional book report, have students create a 90-second “trailer” for the book they read. (This is a perfect project for our 6-8 graders as an alternative to WeVideo).
- How it works: Students collaborate in Vids to pull (or create) images, add compelling text, and use stock music to set the tone, all while summarizing the key conflict and characters.
- Student Outcome: This moves beyond simple comprehension and into creative expression, media literacy, and persuasive writing.
- Student Idea: The “How-To” Guide
- What it is: Have students create a video tutorial explaining a process. This could be anything from “How to Solve this Math Problem” to “A Walkthrough of Our Science Lab.”
- How it works: Students can use the built-in screen recorder to capture their work and use their voice to explain their thinking, step-by-step.
- Student Outcome: This is a fantastic assessment tool. To teach a concept (even to a camera), students must truly understand it.
Getting Started
Ready to try? It’s easier than you think.
- Find It: The easiest way to start is to just type
vids.newinto your Chrome browser’s address bar. You can also find it in your Google Drive by clickingNew > Google Vidsor in the Google “waffle” app launcher. - Try the Best Feature First: Open your first video and find the “Import” or “Convert” option. (It’s often under the
Filemenu). Select a Google Slides deck you already have. Watch as it instantly turns your slides into a video timeline. This is the “a-ha!” moment. - Change the Video Size: Want to make a vertical video for a “Short”? Go to the
Filemenu or theVideo sizebutton in the toolbar to change your format from widescreen to vertical or square. - Explore the Toolbar: Add a new “scene.” Look for the stock media icon to add a free video clip or image. Find the “Record” button to add your own webcam or voice.
- Share It: Notice that “Share” button in the corner? It works exactly like Google Docs and Slides. You can easily share your video with students or colleagues as a “Viewer,” “Commenter,” or “Editor.” It’s already in your Google Drive, so attaching it to a Google Classroom assignment is a breeze.
Conclusion
Google Vids bridges the gap between static presentations and complex video editing. It gives you and your students a powerful tool for creativity, collaboration, and deeper learning, all within the safe and familiar Google environment you use every day.
It’s a fantastic addition that simplifies our work, replacing the need for separate tools like Canvas Studio or WeVideo for many of our everyday tasks. Don’t be afraid to just open vids.new and import an old slide deck. You’ll be amazed at what you can create in just 10 minutes!