Introducing: Google Vids

Title image

Google Vids: A New Tool for Teacher-Created Videos

Google Vids is an AI-powered video creation app for work that is now available for Google Workspace for Education. While it is not yet available for student use, teachers can use Vids to easily create, edit, and share videos for a variety of teaching and learning purposes.

**It will be available for students in the near future, so take time to try it out for yourself now!

Key Features of Google Vids

  • User-friendly Interface: Vids is designed with an intuitive interface for creating, editing, and sharing videos. Users can add content including images, video clips from Drive, videos, GIFs, images, stickers, music, and sound effects from the Vids stock content library.
  • Templates: To help you get started, Vids offers templates that can provide a framework for your videos.
  • Recording Studio: A built-in recording studio lets users record audio, record themselves, their screen, or a combination.
  • Collaboration: Users can collaborate with each other on videos in real-time.
  • Flexible Sharing: Videos can be shared as Google Vids files, MP4s in Google Drive, or downloaded as MP4s for sharing.

Vids in the Classroom: Ideas and Considerations

Since AI capabilities will not be available in the education version, features like “help me create” and read-along teleprompter will not be accessible. However, teachers can still take advantage of the platform’s many other features to create engaging and informative videos.

Here are some ideas for how teachers might use Google Vids in their classrooms:

  • Create instructional videos: Explain complex concepts, demonstrate procedures, or provide step-by-step instructions for assignments. If you are saying the same thing, the same way to everyone then a video may be your best bet.
  • Develop flipped classroom content: Prepare video lectures or lessons for students to watch at home, freeing up class time for more interactive activities.
  • Produce video announcements: Share important information with students and families about upcoming events, deadlines, or classroom updates.
  • Make explainer videos for parents: Clarify classroom procedures, grading policies, or other aspects of your teaching approach.
  • Record student projects: Capture student presentations, performances, or other creative work in a polished video format.

Important Notes:

  • Videos created in Vids have a maximum length of 10 minutes.
  • While Vids works with many browsers, some features may not be available in all browsers. For example, editing and commenting are not currently supported in Safari.
  • A variety of audio, image, and video files are compatible with Vids and can be uploaded from your computer or Google Drive.

As Google Vids becomes more widely available in educational settings, it is poised to become a valuable tool for teachers to enhance their teaching and engage their students in new and creative ways.

See Google’s Blog Update and Help Guide for more information to get started.

Navigating Ed-Tech: A Growth Mindset Approach

Embrace Tech, Embrace Growth

Feeling overwhelmed by ed-tech? A growth mindset can help you navigate the ever-evolving landscape of educational technology.

Why it Matters

A growth mindset isn’t just important for students, it’s a powerful tool for teachers. By embracing a growth mindset, you can:

  • Reduce Stress: View challenges as opportunities to learn and grow.
  • Boost Confidence: Celebrate small victories and learn from setbacks.
  • Enhance Learning: Create more engaging and effective learning experiences for your students.
  • Model Skills: Be transparent about your learning process. Let students see your thinking and problem-solving in action.

How to Cultivate a Growth Mindset

  1. Embrace Challenges: Don’t shy away from new tools and technologies. Everyone starts somewhere, and learning curves are a normal part of the process.
  2. Seek Support: Collaborate with colleagues, our tech integration specialists, and even students. Share experiences, learn from their insights, and build a supportive network.
  3. Celebrate Successes: Acknowledge your achievements, big or small. Positive reinforcement can boost your motivation.
  4. Learn from Mistakes: View mistakes as opportunities for growth. Analyze what went wrong and use it to improve future efforts.
  5. Practice Patience:  Learning new skills takes time and dedication. Be patient with yourself and celebrate your progress along the way.
  6. Start Small: Break down large tech projects into smaller, manageable tasks. Prioritize self-care and take breaks when needed.

By adopting a growth mindset, you can become a more confident, capable, and tech-savvy educator. Remember, it’s about the journey, not perfection. 

As we gather to celebrate Thanksgiving, let’s take a moment to express gratitude for all that we have, including all the tools and resources that technology offers us as educators. But let’s not forget to extend that gratitude to ourselves! It’s okay to make mistakes and feel overwhelmed at times. By practicing self-compassion, we can approach technology with growth in mind to create new learning experiences for our students.

Happy Thanksgiving!

Happy Thanksgiving and a Housekeeping Request

Happy Thanksgiving

We hope you enjoy your Thanksgiving break! Before you leave Tuesday afternoon…

WOULD YOU PLEASE SECURE ALL VALUABLES in the classrooms and office spaces you inhabit. This includes laptops, document cameras, Apple TVs, remotes, and interactive pens.

Further, if it is equipment you handle, would you please make sure all iPads and Chromebooks are in their carts and those CARTS ARE LOCKED and plugged in before leaving.

Finally, would you please also POWER OFF any of the following equipment, if it is equipment you handle:

  • projectors
  • sound amps
  • SmartBoards
  • desktop computers
  • monitors
  • printers

THANK YOU for your cooperation.

Tech break checklist

Introducing a New Resource: AI in the Classroom: A Practical Guide

This blog post introduces a practical guide designed to help educators begin to effectively and responsibly integrate AI into their classrooms. While the guide was initially created by secondary librarians and technology integration specialists, its principles and tools are adaptable for elementary classrooms as well.

Key Features of the AI Guide

This guide provides educators with practical advice and resources to effectively implement AI while addressing ethical considerations:

  • Student-Centric AI Usage Scales: These scales offer clear guidelines for students to understand when and how to appropriately use AI tools. The scales differentiate between “AI Free,” “AI Assisted,” and “AI Enhanced” activities, providing a framework for ethical AI integration in assignments. Printable posters of the scales can be displayed in classrooms as a visual reminder for students.
  • AI Citation & Disclosure Handout: This resource clarifies when to cite AI-generated content and when to disclose its usage. The handout emphasizes transparency in academic work, outlining the importance of citing new content generated by AI and disclosing AI usage for tasks like organizing thoughts or editing.
  • AI Prompting and Evaluation Techniques: The guide introduces two acronyms, PREP and HUMAN, to provide a structured approach to using AI. Ideally, these acronyms could be consistently used across the district.
    • PREP guides prompt creation, emphasizing the importance of a clear role for the AI, a precise prompt, specific parameters for the response, and explicit instructions.
    • HUMAN serves as a checklist to ensure ethical and effective AI use. It encourages users to pause and consider the appropriateness of using AI, examine potential biases, personalize the output, verify information, and determine next steps, including disclosure and citation requirements.
  • Teacher-Friendly Implementation Tips: The guide offers practical suggestions for incorporating AI into the classroom. It clearly outlines the district-approved apps for teacher use and suggests tools that may be appropriate for student use. It emphasizes a progression of I do, we do, you do for classroom integration.
  • Best Practices for Responsible AI Use: The guide highlights essential guidelines for ethical AI usage and data privacy considerations, drawing on recommendations from Common Sense Media. These practices include avoiding personal information input, emphasizing AI’s role as a thought partner rather than a source of facts, understanding the trade-offs of AI usage, verifying information, and using reputable sources in prompts.

The AI guide offers a wealth of resources, including printable posters, customizable rubrics, and suggested AI tools for both teachers and students.

Fall Canvas Updates

This fall, Canvas has rolled out several updates. Here are some highlights:

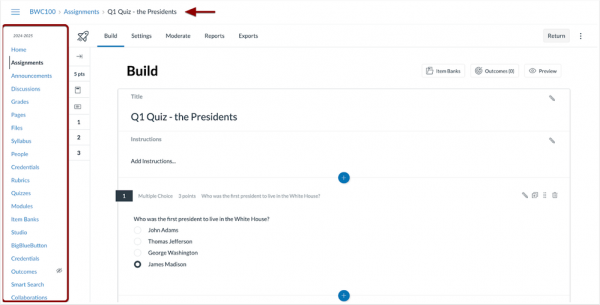
Smart Search: You may have noticed “Smart Search” in the course navigation. This allows teachers and students to search the whole course and Canvas will present the most fitting results for that term. More info.

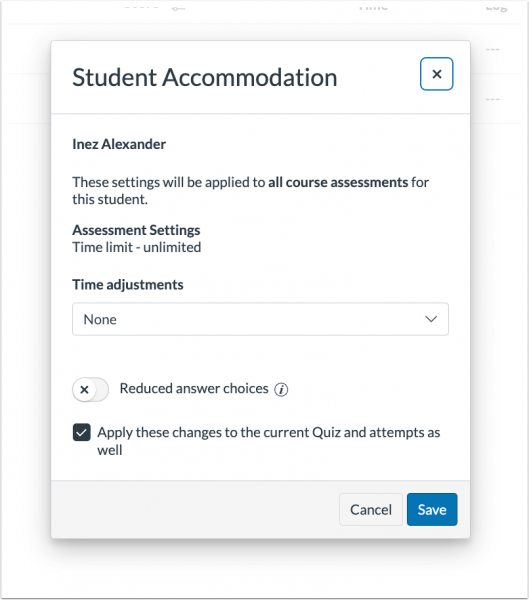
New Quizzes: Add Time to Existing Quiz Sessions: While a New Quiz attempt is ongoing, instructors can moderate a quiz and extend the time allotted for the quiz. Additionally, the student course-level accommodation modal link is moved to the Student column. Previously, this was linked in the Accommodations column.

Location to add time to an active quiz

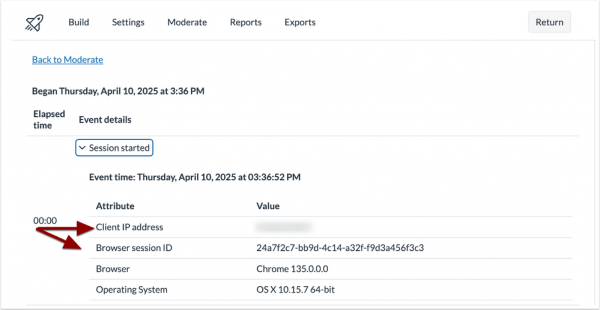
New Quizzes: View Log now shows when and for how long a student navigated away from the quiz.

View of quiz moderation

Coming Soon (11/16):

Multiple Due Dates (Checkpoints) in Discussion: When creating a graded discussion, instructors can set multiple due dates or checkpoints to accommodate different stages of the discussion process, such as the initial post and follow-up replies.—DELAYED as of 11/14

Options for discussion checkpoints

Speedgrader Experience: Faster load times and enhanced stability in Speedgrader. Additionally, there will be some interface updates:

  • A streamlined interface for the Section drop-down menu
  • A clearer and more prominent No Submission alert
  • The Submission Status is updated to a drop-down menu
  • Rubrics are automatically displayed in the traditional view
  • Media attachments and submission comments are moved and the delete icon is changed.

Rubric Improvements: 

  • You can import and export Canvas rubrics in a CSV or XML format.
  • On the Rubrics page, instructors can copy rubrics from the current course to another course.


Canva Teams Explained

canva teams explained

Canva is an incredible tool that can be used to create stunning visuals for a variety of purposes. From presentations to social media graphics, Canva has everything you need to bring your ideas to life.

Team Up for Success

location of team switcher in Canva

When using Canva, it’s important to be mindful of which team you’re creating under. This will determine who can access and collaborate on your designs. Here are some tips to keep in mind:

  • School Team: If you’re creating designs to share with students or collaborate with colleagues within your school, make sure you’re creating under your school’s team.
  • District Team: For district-wide projects or collaborations, switch to the Plymouth-Canton Community Schools team. Students should NOT create under this team, we are hopeful that we will be removing students access to this team soon.
  • Public Links: If you forget to switch teams you may need to create a public link, please note that students don’t have this option.

Canva Resources to Get You Started

To help you get started with Canva, check out these helpful resources:

Action Required to Utilize Newsela with Canvas

title image

We have encountered some teachers having issue when trying to set up their Canvas/Newsela integration this school year. We have identified the problem and an easy solution to move forward. It is essential to archive any Clever-created Newsela classes before setting up the Canvas/Newsela integration. These Clever-created courses were launched automatically at the beginning of the school year. If you would rather link you classes with Canvas you can login to Newsela:

  1. Click your initials in the upper right corner. Select Settings.
  2. Click the Class Directory and find the class in your list of classes.
  3. Change the status to Archived

    Location to archive/activate courses in Newsela
    Location to archive/activate courses in Newsela

Please note, this will remove record of previous assignments. You can always follow these steps again to re-activate the class if you lose unintended data.

This step is crucial because attempting to sync while active Clever classes exist may lead to syncing conflicts.

Once you have archived the Clever classes, you can proceed with setting up the Canvas/Newsela integration by following the instructions in the Canvas/Newsela Teacher Setup Guide. This will allow for seamless syncing of your Canvas courses with Newsela.

Tech-Focused November PD Courses

Per Kevin Karr’s communication, teachers have several options of courses for the November PD Window. We wanted to highlight several, new offerings you might consider taking.

Elementary focused:

If you are new to the district:

If you are interested in learning more about some of our paid digital subscriptions, search for courses on: Canvas, IXL, Edpuzzle, and Newsela.


Google Docs: A New Tab on Efficiency!

Google Docs has just rolled out an awesome new feature that will revolutionize the way you organize your documents. Similar to the tabs you use in Google Sheets, you can now add multiple sections to a single Doc. This means less clutter, fewer files to manage, and a more streamlined workflow. See the image below to locate the feature.

location of doc tabs on menu

Whether you’re a teacher, administrator, or simply looking to boost your productivity, tabbed documents offer a world of possibilities. Imagine organizing lesson plans, student portfolios, or group projects into a single, well-structured document. You can even create separate tabs for different drafts of a research paper or compile past newsletters into a single resource.

If you want to take a look at how it looks, make a copy of this tabbed document demo made by John Sowash, creator of the Chromebook Classroom blog. You can read his post about this feature, here. While you are there, check out his blog, I just learned you can now add a star rating in Google Forms.

New Feature: Classwize Focus Library

focus mode options

Focus Plans are a new feature in Classwize that allow teachers to curate and save lists of online resources for students to use during class. This exciting addition to Classwize can help teachers create more focused and engaging learning experiences by:

  • Minimizing Distractions: Teachers can use Focus Plans to restrict student internet access to a specific set of websites, applications, or online tools relevant to the lesson or activity. This helps eliminate distractions from non-educational websites and apps, keeping students on track and engaged in the learning process.
  • Promoting Responsible Technology Use: By providing students with a pre-selected list of trustworthy and educational resources, Focus Plans encourage responsible online behavior and digital citizenship. Teachers can curate resources that align with their curriculum goals and ensure students are accessing high-quality, age-appropriate content.
  • Saving Time and Effort: Once created, Focus Plans can be easily reused across multiple classes and lessons, saving teachers valuable time and effort. This allows teachers to focus on delivering engaging instruction and interacting with students, rather than constantly managing internet access.

How to Create a Focus Plan:

Creating a Focus Plan in Classwize is simple and intuitive:

  1. Go to Classwize > Focus Library.
  2. Select Create Focus.
  3. Enter a Name for your plan.
  4. In the Resources field, start typing the website, application, or URL you want to include.
    • Classwize provides a dropdown menu with suggestions, making it easy to find and select the desired resource.
  5. Add as many resources as needed to your Focus Plan.
  6. Choose whether to have Classwize Open tabs for each resource or simply close all other tabs that are not included in the plan.
  7. Select Save Focus to save your plan or Save & Create New to create another plan.

With its ease of use and powerful functionality, the new Focus Plans feature in Classwize is a valuable tool for teachers looking to enhance their classroom management strategies and promote a more focused and productive digital learning environment.

Find more information about Focus Mode in our Classwize Tech Guide.

Consult Classwize’s guide to creating a Focus Plan and adding to your Focus Library.