September Brain Pop Bulletin


The Teachers’ Lounge is now the BrainPOP Bulletin! Welcome to our brand new newsletter and your place for fresh instructional ideas. Every month, we’re sending a video tip to your inbox that you can use in the classroom tomorrow. In September’s Bulletin, learn about this movie-viewing strategy that will make students’ minds light up. It’s one way to make movies a more active part of your class, while providing an opportunity to practice essential literacy skills. Access more information HERE.

Increase Engagement with Video

In today’s rapidly evolving educational landscape, harnessing the power of technology has become paramount to engage students effectively. Three standout platforms Edpuzzle (6-12 accounts connected through Canvas), BrainPOP (As a reminder, all district students, K-12 can access our paid subscription to BrainPop/BrainPop Jr via Clever at https://clever.com/in/pccs), and Teachflix have emerged as game-changers in the world of educational video content. These platforms offer a dynamic combination of video resources and interactive features, transforming traditional passive viewing into an engaging learning experience.

While you probably already ask students to view educational videos in your class, you may be looking for ways to keep students engaged with the video. Matt Miller (of Ditch that Textbook fame) has developed Teachflix and an activity pack to boost engagement with video. For example, in the Word Splash activity students write down 12 words from the video that stand out to them, then swap their page with a partner to watch the video again, crossing off their partners words as they hear them. This Teaching with TEACHFLIX resource is full of ready-to-use activities for students.

preview of word splash activity

Awesome New Quizzes Canvas Updates!

fall canvas updates

Here are a few September Canvas updates in New Quizzes to be excited about:

New Quizzes: Build on Last Attempt

In New Quizzes, instructors can allow students to build on their last attempt of a quiz by reattempting incorrectly answered questions.

show build on last attempt workflow

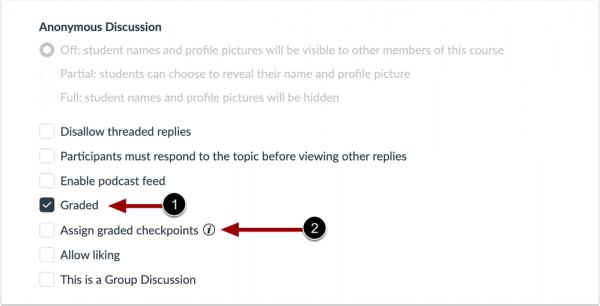
In New Quiz Settings, select Allow multiple attempts [1], and then select the Enable build on last attempt checkbox [2].

Note: When the build on last attempt feature is enabled, students can only view questions marked with incorrect answers, all other questions are hidden. If you have short answer questions you want them to reattempt, you’ll want to add a waiting period to give you time to grade those items.

Additional Details

Students can reattempt incorrectly answered questions until the answer is marked correct in SpeedGrader or they run out of attempts. Students who get all questions correct will not have the option to reattempt.

❗ Bonus Tip: Did you know that you can grade one quiz question at a time in SpeedGrader? How do I grade one quiz question at a time in Spee… – Instructure Community (canvaslms.com)

New Quizzes: Quicker Item Analysis Report

In New Quizzes, instructor access to Item Analysis reports is faster and the user interface is updated. While the item analysis used to take 24-28 hours, it will now take about 1 hour (depends on the size of the quiz and other factors).

quiz analysis interface

If you like these features but have Classic Quizzes in your course, reach out for information about migrating those quizzes to New Quizzes. There have also been hesitations about partial credit on new quizzes, check out this resource (3 slides) that breaks down how this works in New Quizzes.

Not sure how to interpret the item analysis? New Quizzes Quiz and Item Analysis – Instructure Community (canvaslms.com)

Sharing New Quizzes

If you have tried to share a New Quiz with a colleague you may have been frustrated if images or audio did not come with the quiz. To solve this, you can export the quiz file (QTI ZIP file) with these directions: How do I export a New Quiz from a course? – Instructure Community (canvaslms.com).

After exporting the file, you should be able to email the file to a colleague and they will be able to import it into their quiz. How do I import a quiz from a QTI package in New Q… – Instructure Community (canvaslms.com)

This isn’t the typical, seamless process of sharing content in Canvas, but we are hopeful can an update will come down the road.


Remind’s Evolving Business Structure: Embracing Canvas for Better Communication

Hello, Canvas for Messaging

In the ever-evolving landscape of educational technology, adaptability is key. Remind, a popular communication platform for educators, is making changes to its business structure that will affect the way our district’s users send and receive messages. Many of you received an email from Remind about these changes. We encourage you to embrace Canvas as the primary platform for communicating with students and families.

What’s Changing with Remind?

Remind has been a helpful tool for educators to connect with students and parents, providing a streamlined way to share important updates. However, Remind will be limiting the number of messages our district’s users can send starting September 13, 2023. This change may impact how you communicate with your students and their families. While we understand the convenience of Remind, we want to offer Canvas as an alternative solution that ensures effective communication without restrictions.

Why Canvas?

Canvas, our district’s learning management system, can serve as the ideal platform for seamless communication between educators, students, and parents. Canvas offers a mobile app that allows students and families to receive instant notifications. This ensures that important messages and updates are never missed, even on the go. By consolidating communications within Canvas, everything related to your course can be found in one place. No more switching between multiple apps or platforms. For example, if a parent checks a grade or due date in the Canvas app, they can message you directly from that screen instead of opening Remind.

Notification Settings

Due to the change in communication methods, you might encourage students to update their Notifications settings in the mobile app. Observers can also set up alerts for certain situations like a missing assignment or Announcements posted. See the chart below for helpful links and a quick video guide.

Plan to send out a communication to students and families about the settings you recommend for your course. If you use Announcements often, ask they adjust their settings to get push notifications for Announcements. If you plan to utilize the Canvas Inbox more frequently, prompt them to check that often.

Change can be daunting, but it can also lead to improved efficiency and effectiveness. By embracing Canvas as our primary platform for communication, we can provide students and families with a more reliable and comprehensive solution.


Action Required: Publish Your Course 23-24 Courses

Please note that each teacher must manually publish the course(s) they want to be visible to students.

Publishing your course only takes one click! From the Course Card on your Dashboard, click “Publish” (see screenshot below).
click publish on the course card on the dashboard

Alternatively, you can open the course home page and click the “Publish” button on the right side of the screen (see screenshot below).


Rest assured, students will not be able to access the course until the term start date. You can verify this under the course Settings (and adjust if desired).

Course Term settings

As a reminder, your courses in MISTAR have been auto-populated in Canvas and auto-rostered with students. These are the course(s) you should publish and actively use with students. Any manually created courses should either be copied or cross-listed with your auto-populated courses. You can also cross-list multiple sections of the same course following the instructions provided in one of our previous posts.

Need Help with Canvas?

get help with Canvas

Canvas is an important learning tool in our district. We hope that you continue to find it a valuable teaching and communication tool. If you are new to the district or have questions come up about it, we want you to be aware of several resources that are available to you.

First, click the “Help” icon on the Global Navigation Menu. For general and common questions try searching the Canvas guides. If your problem or question is unique and specific to your situation you can chat online or call the Canvas Support hotline. You can be connected with a support agent that can help you almost immediately.

image of Canvas help menu

If you would like to slowly browse resources, please check out our resources at the P-CCS Tech website, https://tech.pccsk12.com/canvas-lms/

Have a lot of questions? You can set up a 45-minute meeting with a Panda Pro. This experience is available through the beginning of September. Find more about this service on their website.

If you are instructional staff working on meeting your PD expectations, please note we have a number of courses including the following listed below (all of them are 3 hours) that can help increase your understanding of how to use Canvas effectively available for you in the Catalog. https://catalog.pccsk12.com/

  • Canvas 1.0
  • Canvas 2.0
  • Canvas 3.0
  • Canvas in the Face to Face Classroom
  • Simplify and Streamline your Elementary Classroom with Canvas

As always, please submit a tech ticket if you have any questions. https://links.pccsk12.com/helpdesk

Cross-Listing Your Canvas Courses

Canvas crosslisting tips

As we approach the new school year, those of you who are teaching multiple sections of the same course might consider cross-listing in Canvas. Cross-listing allows you to move section enrollments from individual courses and combine them into one course. This feature is helpful for instructors who teach several sections of the same course and only want to manage course data in one location. So if you are a teacher that has multiple sections of one course or an elementary specialist that has many different sections, cross listing may be a great option for you and a big time saver. However, this action should only be done before a semester starts. Canvas recommends it be done before a course is published. If it is done after a course is published and notably student work has been submitted, that student work will be lost. Review the slideshow below carefully to help you decide if you want to do it.

Please review this slideshow carefully to review the pros and cons. The slideshow also walks you through the steps to cross-list your courses. Please note that teachers have the ability to cross-list courses but do not have the option to de-crosslist. To de-crosslist sections or for further assistance with cross-listing, submit a tech ticket.

Tips for Cross-Listed Courses

Whether you are new to crosslisting or have done it for awhile, review this list to help run it as efficiently as possible. Crosslisting should only be done at the beginning of a term (prior to any student submissions so to avoid their loss).

Be Sure To:

  • Keep “People” hidden on the Course Navigation Menu to protect student privacy
  • Change the course name so students don’t get confused if their scheduled section meets at a different time
  • If you want to use discussions, set it up as a group discussion so students are only interacting with people in their section

Streamline Your Workflow:

  • You can assign things (especially quizzes) per section to customize availability times and due dates
  • You can sort Speedgrader submissions by section
  • You can sort the Gradebook by section

Canvas Crosslisting Tips by kaelyn.bullock

Prepping Your Canvas Courses for the New School Year

Prep your canvas course


We’re excited to let you know that your Canvas courses will soon be visible and ready for action. Canvas is designed to simplify your teaching journey and provide you with a user-friendly platform to engage with your students, organize course materials, and foster a dynamic learning environment.

Course Template

To assist you in creating an engaging and effective online learning space, we’ve prepared comprehensive resources for the course template. These resources include step-by-step guides, video tutorials, and best practices for setting up your Canvas courses. Whether you’re a seasoned Canvas user or a first-timer, these tools will ensure that you’re making the most of Canvas’s features.

Import Previous Content

We understand the value of your time, which is why Canvas allows you to seamlessly import content from your previous courses.  Whether it’s assignments, quizzes, or discussions, the process is intuitive and streamlined. This means you can build upon the successful elements of your previous courses while introducing new and exciting content. Courses from last school year can be found at https://pccsk12.instructure.com/courses at the bottom of the page under “Past Enrollments.” If you need help locating courses from previous school years, check this blog post. Once you have located your previous content, you are ready to import it into your new courses following the steps below.

16 STEPS

1. The first step is to open Dashboard and click your new course.

Step 1 image

2. Click Import Existing Content

Step 2 image

3. Click Select One

Step 3 image

4. Select Copy a Canvas Course

Step 4 image

5. Type the name of your old course.

Step 5 image

6. Click your old course when it appears on the drop down.

Step 6 image

7. Click Select specific content

Step 7 image

8. Optional: Click Adjust events and due dates

Step 8 image

9. You have the option to attempt a bulk shift of due dates or, simply, remove the dates.

Step 9 image

10. Click Import

Step 10 image

11. Under “Current Jobs,” click Select Content

Step 11 image

12. Select the content you would like to include. Do NOT select “Course Settings.”

Step 12 image

13. Note that you can open the option to select specific pages, assignments, modules, etc.

Step 13 image

14. Uncheck specific items you do not want to bring over, if desired.

When all you want is selected, click Select Content

Step 14 image

15. Review any issues that might come up.

Step 15 image

16. That’s it. You’re done.

Step 16 image

Here’s an interactive tutorial

** Best experienced in Full Screen (click the icon in the top right corner before you begin) **

https://www.iorad.com/player/1992034/Canvas—How-to-Import-Course-Content

Please submit a ticket if you have any questions.

Canvas Updates Summary

Canvas update summary

In case you missed it, here’s a round up of some of the best Canvas updates to be aware of:

K-5 Teachers: Welcome to Lumio!

Lumio is coming to P-CCS!

We are so excited to share that all Elementary Teachers will be getting Lumio accounts beginning on Monday August 7! P-CCS has partnered with SMART to bring new SMARTboards to every elementary classroom over the next three years. There are so many new amazing features that help make these Smartboards the best walk up and teach interactive technology and Lumio is the online component that leverages the Smartboard hardware! But even if you are teaching in an elementary building that didn’t get the new Smartboards this year, you will still have access to Lumio for use with your current SmartBoard and in the future when that board is replaced with a new one!

So what is Lumio?

Lumio is the online component of the SMART technologies resources that include lesson resources, interactive activities, games, collaborative workspaces, and so much more! (If you remember Smart notebook and Smart Exchange from years ago, this is the newer, better, online version!) Lumio is the digital learning tool for transforming lessons into active, collaborative learning experiences that engage students on their own devices. Transform lessons in seconds, then deliver them to student devices in a browser, or via Google. You can even combine different file types (PDFs, Google Slides, PowerPoint and Notebook files) into a single Lumio lesson! Import the lessons you already use, combine existing resources and enhance them with customizable components including games, collaborative workspaces and much more. Then deliver them to student devices quickly and easily, all from a browser or Google Drive.

How do I get started?

Starting Monday August 7, check your P-CCS email for information on how to access your account. Then keep an eye in your inbox for weekly emails from Lumio that will give you step by step training to use ready made resources in Lumio, create your own and how to share with students! If you ever need support, put in a tech request for Technology Integration at helpdesk.pccsk12.com.