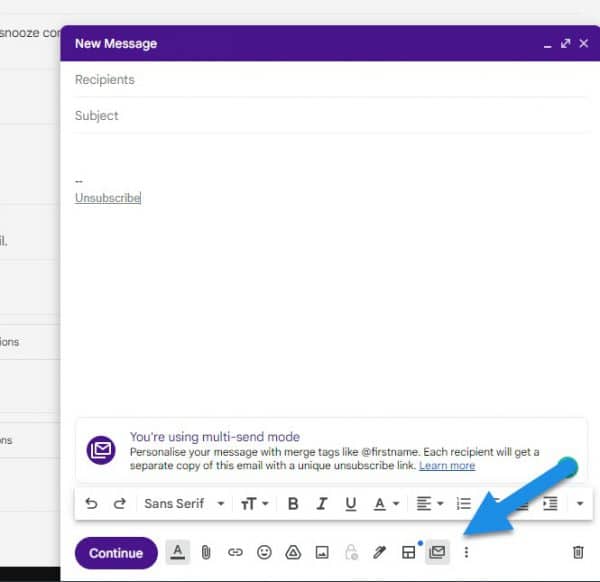
TIP 1 – Gmail’s new multi-send feature allows you to send a bulk email to multiple recipients with some customization (in contrast to simply being bcc’d in a regular email).
1.Open Gmail and click the Compose button.
2. From the compose window, click the double envelope button to switch on multi-send. Read the short description of the feature and click Turn On to continue. When multi-send is enabled, the compose window has a purple header.
3. Add the recipients in the To field. You can type in their email addresses, paste a list of addresses, or use a mailing list from Google Contacts.
4. Enter the subject line and compose your message as you normally would.
I suggest removing the unsubscribe link before sending. If you don’t, if a recipient unsubscribe from your emails, you will receive a notification email from Google. Next time you send a mass email, anyone who has unsubscribed from your emails is automatically removed from the recipient list.
When multi-send mode is on, you can insert merge tags like @firstname to personalize your email for each recipient to show their first name when the mail is sent. The merge tags are replaced with the appropriate name for each recipient.
Click Continue when you’re ready to send the email.
5. To send yourself a test email, click Send Preview. Once you’re ready to send the mass email, click Send All.
To switch between regular email and mass-mail modes in Gmail, click the double envelope button from the compose window toolbar.
————————
TIP 2 – Stop Chrome from refreshing your tabs with this tab management feature that helps keep websites active in the background in Chrome.
If you have a lot of tabs open on a regular basis, you have probably noticed that some of your older tabs have to reload before you can use them again. This happens because of a Chrome feature that “discards” any tabs you haven’t used for some time, in order to save memory and prevent the browser or even your PC or Mac from running slow.
How to keep a website active in the background in Chrome
Follow these steps to keep your background tabs active and avoid refreshing them when you return.
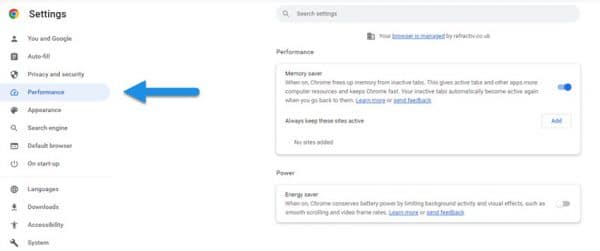
1. Open Chrome settings by typing chrome://settings/ in the address bar or by clicking on the three dots from the top right corner > Settings.
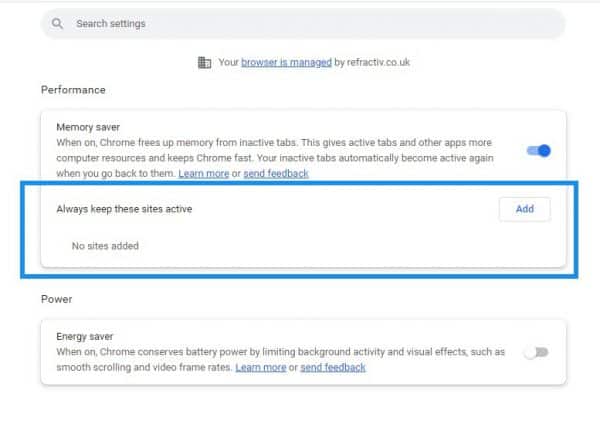
2. From the left sidebar, click on Performance.
If you want to keep all your tabs active, no matter which site you’re visiting, simply switch off the Memory saver toggle. If you’re looking to protect only certain sites from being made inactive, continue to the next step.
3.Click the Add button that is next to Always keep these sites active.
4. Type in the websites you want to always keep active, following the below rules.
If you want to keep active:
Entire domains and subdomains: enter only the main domain of a website. For example, google.com prevents the suspension of subdomains like mail.google.com and drive.google.com.
Specific domains, but not any subdomains: include a dot (.) before the main URL. For example, .google.com won’t prevent the deactivation of subdomains such as mail.google.com, and drive.google.com.
Specific subdirectory: include the URL path. For example, www.google.com/finance will prevent the deactivation of all Google Finance pages, but won’t stop the suspension of the www.google.com main pages.
URL host and query components: Asterisks (*) can be used as wildcards. For example, https://* avoids deactivation of all HTTPS sites, while youtube.com/watch?v=* matches and prevents the suspension of YouTube videos.
How to find more information about discarded tabs and stop Chrome from putting a specific tab to sleep
1. Open the Discards panel by typing chrome://discards/ in the address bar.
Here you can see if the feature has been triggered for any of your currently open tabs.
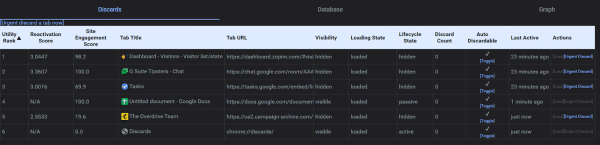
2. On the left side of the table, you can see the Auto Discardable option. If you want to ensure a specific tab will not be discarded, click on the toggle button to remove the checkmark ✔.
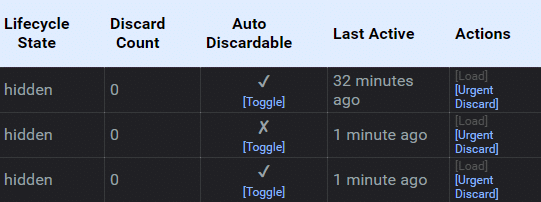
In this example, the first tab has a checkmark, which means Chrome is allowed to discard it, while the second tab has an ❌, which indicates that the tab will remain active no matter what.
It’s important to note that this change only applies to that instance of the tab, not the website domain or the exact URL. Next time you open the same URL in a new tab, the Auto Discardable feature will be set back to ON (✔) by default. Use the instructions from the first part of this tip to always prevent Chrome from putting websites to sleep.
————————
TIP 3 – ScreenPal, a Chrome extension, works inside comment and text boxes, saving steps and time for busy educators. Yes, it works right in Gmail, Docs/Slides comment boxes, Canvas, and pretty much anywhere with a text box. It gets better. A thumbnail or GIF is automatically generated. Here’s Brian Buffington showing you an example.