Linewize Content Filtering on P-CCS Google Accounts

Linewize

The district’s adoption of Linewize provides several advantages for our students, staff, and families. We have streamlined our content filtering process, leading to a more user-friendly experience and simplified troubleshooting. Our educators can now leverage Classwize for digital classroom management across various devices (Chromebooks, MacBooks, and Windows) and have the ability to customize classroom-specific filtering rules (within established parameters). Furthermore, Qustodio empowers families to monitor their students’ online activities outside of school hours, even on personal devices, promoting a safer digital environment.

An additional advantage of Linewize is our ability to implement filtering rules based on user accounts, not just devices. This means P-CCS Google accounts will have content filtering applied whether they are used on district-owned or personal devices. When students or staff log into the Chrome browser with their P-CCS Google account, the Linewize extension is automatically installed, ensuring that the district’s filtering policies are applied within that browser window. It’s important to note that these filtering rules only apply to activity within the Chrome browser while signed into a P-CCS Google account.

Users can browse without Linewize content filtering on a personal device by signing out of their P-CCS Google account in Chrome, creating a separate Chrome profile not associated with their P-CCS account, or using a different web browser altogether.

Please note that signing into the Chrome browser is different than signing into any Google website. Signing into Chrome syncs your browsing data and settings, while signing into a Google website only grants access to that specific site and other Google websites.

REMC October courses can support your new school year initiatives

REMC October courses

REMC courses are designed to enhance your teaching toolkit and foster engagement and student learning. Whether you’re looking to inspire your classroom with innovative teaching methods or simply want to refresh your approach, REMC courses provide the perfect opportunity.

With the convenience of virtual learning, you can complete these courses from the comfort of your home, at a time that fits your schedule. Plus, upon completion, you’ll earn 10 FREE SCECHs!

Registration deadline is Thursday, October 3rd, each course begins on Monday, October 7th. Thanks to the generous support of REMC SAVE’s vendor partners, all courses are FREE and there are no SCECH fees. Don’t miss out on this opportunity to expand your skill set and strengthen your classroom!

Register for October courses here:

Register by Thursday, October 3rd. You will receive a welcome email with the course information prior to the course start date. If you have questions or need further assistance with your course registration, please click here.

MISTAR-Q: Supportive Training for (New) Teachers

Registration is open for Q ACADEMY: TEACHER EDITION (formerly Monarch)
Aug 26 through Dec 2, 2024
Registration fee: $0

Teachers are invited to participate in Q Academy: Teacher Edition, an asynchronous online course formerly known as Monarch. While this course is rebranded and reorganized, the learning activities remain the same as Monarch.

Working online at your own pace, you will complete activities designed to increase your skill and knowledge of MISTAR teacher apps including Class Attendance, Grade Book, Seating Chart, generating reports, and more. This course is especially beneficial for teachers new to MISTAR.

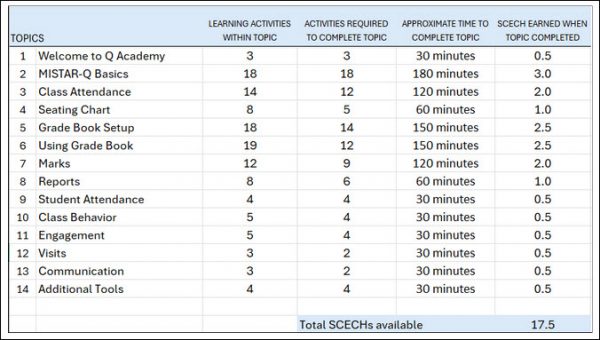
You may earn between 1.0 and 17.5 SCECHs, depending on which topics are completed by Dec 2, 2024. At least two topics must be completed to qualify for SCECHs and you may select which topics to complete:

Q Academy training

Should I register for Q Academy if I previously participated in Monarch?
The activities are the same – if you completed Monarch, you completed all content in Q Academy.  If you participated in Monarch but did not complete the course, you are welcome to register for Q Academy but your progress will not transfer from Monarch.

Register here  – After registering, watch for emails on Aug 26 with details on how to get started.

Please register only if you fully intend to participate as there is high demand for this course.

Access to Microsoft Office 365 desktop apps ending in August

A1 Plus retirement

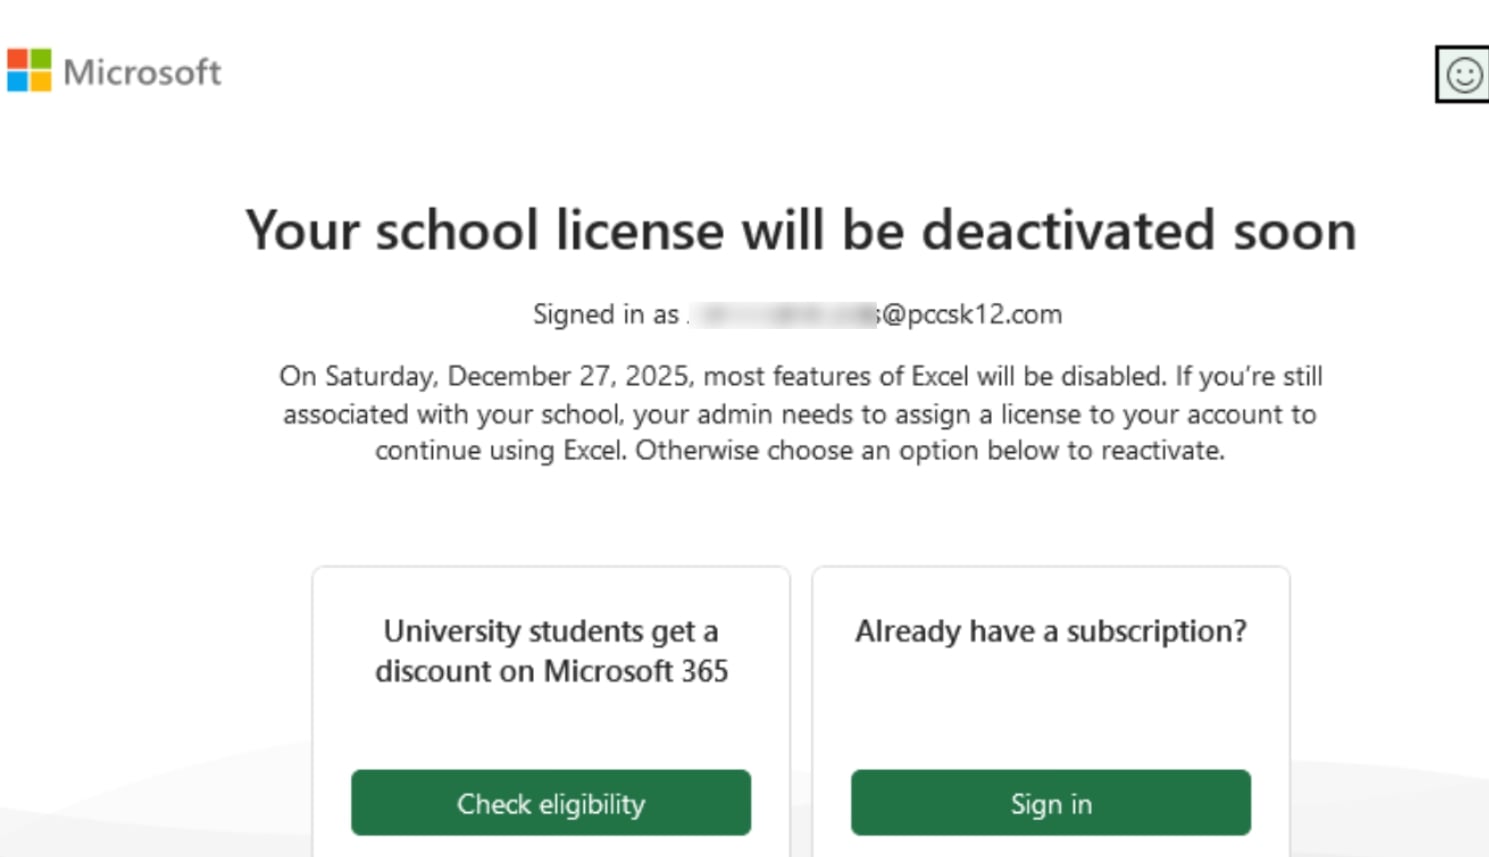
Earlier this month, Microsoft notified our district that they would be ending our access to Microsoft Office 365 desktops apps when they retire our licensing program (Office 365 A1 Plus) on August 1, 2024. Their announcement impacts all school districts with the same licensing. While we shared with them our frustration for the short notice, they aren’t changing the retirement date. After August 1st, staff that have downloaded and installed Office 365 versions of Word, Excel, and PowerPoint will find those programs no longer work. You can identify if you have an impacted program by launching one of those programs and looking in the top right corner for your name and initials. If you see your name and are signed in, you have a program that will stop working in August. See this pic for a sense of where to look in Word.

where to locate name in Office

Some options post August 1st for those impacted.

  1. Use the Google Workspace for Apps (Recommended). As a Google Workshop for Education district, it is strongly recommended that staff use Google Docs, Sheets, Slides, etc. All of these apps (and more) are available through Google Drive.
  2. You can still use Microsoft Office 365 online since that licensing remains. Browse to portal.office.com and sign in using your email address and network (not Google) password.
  3. Use a free office suite alternative, such as Libre Office, which is available in the Company Portal for those that want to download and have installed a desktop office suite. Libre Office is highly compatible with Microsoft Office documents. It can open and edit all of the Microsoft Office file formats, as well as save in those same file formats. See this video guidance for how to set it up to natively load and save in Office formats.
  4. Departments/schools interested in purchasing licensing for Office 2021 for one or more of their staff can submit a service request so our department can work with the requester on their purchase and our installation. Current REMC pricing for Office Standard runs through June. The new purchase price will be updated in July (see here for July and beyond pricing). 


Watch Out for Phishing Emails – A Warning for Teachers (and all others)

phishing icon

Phishing is a form of cyber attack that has become increasingly common and sophisticated in recent years. As teachers, we need to be on guard against these malicious attempts to steal our login credentials, personal information, or install malware on our devices.

What is a Phishing Email?

A phishing email is a fraudulent message designed to look like it comes from a legitimate source, such as a company, bank, or even our own school district. The email may ask you to verify account information, login with your credentials on a fake website, or open an infected attachment or link.

The goal of the attacker is to trick you into divulging sensitive information or deploying malware on your computer or the school’s network. Phishing attacks rely on social engineering to exploit human psychology and tendencies to trust.

How to Spot a Phishing Email

While phishing emails can be quite convincing, there are some common warning signs to watch out for:

  • Emails creating a sense of urgency, fear, or panic to prompt an impulsive reaction
  • Misspellings, bad grammar, or inconsistencies in the email content or sender address
  • Requests for sensitive information that a legitimate company should already have
  • Generic greetings like “Dear User” instead of your name
  • Suspicious links or attachments

Remember, legitimate companies will never ask you to provide things like passwords or credit card numbers via email.

Stay Vigilant

As teachers trusted with handling confidential student data and accessing sensitive school systems, we must remain vigilant against phishing scams. Always scrutinize email sources, hover over links before clicking, and avoid opening attachments unless you are absolutely sure they are safe.

If you suspect a phishing attempt, do not respond and immediately report it to our IT department by clicking the phishing hook icon in our email. On mobile, it may be toward the bottom of the email and on a laptop it is off to the right. This will report the phishing attempt to the district.

phishing icon

Protecting ourselves and our district from these cyber threats is crucial. Let’s do our part to identify and stop phishing attacks before they cause harm. A few moments of caution can prevent a major security breach.

Protect Yourself and Our Students: Password Hygiene for a Safer School Network

In today’s digital world, our school’s data, from student records to email accounts, is constantly targeted by cybercriminals. One of the most important ways we all contribute to the safety of our school’s network is by practicing good password hygiene.

What is Password Hygiene?

Password hygiene refers to the habits and techniques you use to keep your accounts secure. Good password hygiene makes you a much harder target for hackers.

Why Does it Matter for Our School?

  • Protecting Student Data: Students trust us with their sensitive information. Strong passwords help prevent breaches and keep their details safe.
  • Avoiding Disruption: A single compromised account can spread malware, disrupt classes, and cause headaches for everyone.
  • Setting a Good Example: Students look up to us. By demonstrating good password habits, we teach them valuable cybersecurity skills for life.

Password Hygiene Best Practices

  • Uniqueness is Key: NEVER reuse passwords.  If one account is compromised, a reused password puts EVERY account using it at risk.
  • Avoid the Obvious: Don’t use your name, birthdays, street address, family names, or other easily guessable information in your passwords.
  • Get Creative with Passphrases: Instead of complicated passwords, try a passphrase. It’s longer, easier to remember, but harder to crack. Example:  “IRideMyBlueBicycle2School!”
  • Don’t Be Afraid of Complexity: The longer and more random your password, the better. Mix uppercase, lowercase, numbers, and symbols.
  • Absolutely NO Sharing:  Your passwords are like your toothbrush – never share them with anyone, no matter how much they insist!
  • NO Common Passwords:  Lists of the most common passwords (like “123456” or “password”) are easily available to hackers. Don’t make it easy for them!
  • Password Managers: Consider a password manager – it stores and generates strong, unique passwords for each of your accounts.

Additional Tips

  • Change Passwords Regularly: A good rule of thumb is to change your critical passwords (network, etc.) every 3-6 months.
  • Enable Two-factor Authentication: If a website or service offers it, use it! This adds an extra layer of protection.

We’re all in this together!

By following these simple password guidelines, teachers and staff can dramatically improve the security of our school community.  Let’s all work together to create a safe and secure digital learning environment.

Need More Help?

If you have questions or need assistance with your passwords, don’t hesitate to submit a service request.

FREE Summer PD from Teq

Teq free PD

Make your summer learning fun and convenient with Teq’s free, virtual PD! Check out their great lineup of courses for everything from brushing up on basics to exploring cutting-edge edtech. Free to register/attend and space is limited, so snag your spot early!

Sign up for any course, a series, or join them for all! Topics include:
• Google: Transitioning away from Jamboard; Gemini AI tool; and getting started or learning advanced skills with Google for Education apps like Docs, Classroom, and Slides.

• Lumio: Get started with SMART’s online lesson delivery platform or take your skills to the next level.

• Blended Learning: Brush up your blended learning skills and learn some new tools with either our beginner course or the advanced course.

• Administrator: Start your school year off right before it begins with administrator-focused PD.

• Minecraft EDU: Learn how to implement Minecraft EDU in your class or school and how to content it across content areas.

• Getting Started with CSDF: Learn how best to align to the new Computer Science and Digitial Fluency standards.

• Microsoft for PBL: Discover how to use Microsoft tools to deliver memorable PBL.

• Tinkercad: Learn how to use Tinkercad to help students create amazing 3D designs and prints.


Heads up Google users, Google is changing the look of the sign-in page:

Google's new sign in page

What’s the same

  • The steps to sign in haven’t changed. You enter the same information you usually do, like your email address and password.
  • You use your account to sign in securely to the same Google services as before.

Why the page changed

The new sign-in page has a better layout for all screen types, which includes large and wide screens. The sign-in page adjusts to your screen’s size.

Where the change happened

The new sign-in page shows up on:

  • Computers
  • Phones
  • Tablets

You can find it when you sign in to a Google app or a Google service on a browser, like Chrome.

If you use an older version of a browser, you may still find the old sign-in page.

How to help keep your account secure

To take extra steps to strengthen your account’s security:

  • Do a Security Checkup to review security settings and activity.
  • Visit the Safety Center to find out about online security and privacy tools.

If you sign in on a device that’s not yours, learn how to browse in private to help protect your account.

[How-To] Connect to the P-CCS Wi-Fi Network

For STAFF

If you have a personal device and would like to connect it to a district wireless network, please connect it to the PCCSK12-Staff network using your network account credentials. Your network account is the same one used to login to any district desktop or laptop (not Google/Chromebooks). If you do not remember your account information, please submit a tech request.

Disclaimers

  • District Chromebooks will automatically connect to the PCCSK12-Devices network.
  • Devices such as AppleTV and Chromecast will need to be authorized by the tech department first. Please fill out this form if you would like to have one connected.
  • Home and  personal assistant devices such as Google Home/Nest (Google Assistant), Amazon Echo (Alexa), and Apple HomePod (Siri) are not allowed on the district network. Personal assistant services built into personal smartphones are unaffected.
  • In most areas we only offer a 5 GHz WiFi network. If your device only supports 2.4 GHz you will not be able to connect.

For STUDENTS (BYOD)

If you have a personal device and would like to connect it to a district wireless network, please connect it to the PCCSK12-Students network. When prompted for a username and password, use your network logon credentials (username without @pccsk12.com at the end) to connect. Please note that student usernames and passwords will not work on the PCCSK12-Staff network or any other network.

Disclaimers

  • In most areas we only offer a 5 GHz WiFi network. If your device only supports 2.4 GHz you will not be able to connect.

Please see the following device-specific guides for connecting to the network.

If you have a personal device and would like to connect it to a district wireless network, please connect it to the PCCSK12-Students network. When prompted for a username and password, use your network logon credentials (username without @pccsk12.com at the end) to connect. Please note that student usernames and passwords will not work on the PCCSK12-Staff network or any other network.

Instructions for Chrome OS (Chromebooks)

Click on your picture icon in the bottom right-hand corner

chromebook-wi-fi-directions-pccsk12-students-network

Click on your current WiFi Connection to bring up the list of available network then select PCCSK12-Students if you are a student, and PCCSK12-Staff if you are a district staff member.

Fill in the following fields as seen in the screenshot to the left. Make sure to use your username (P-CCS Google email address for students, network account for staff) in the “Identity” field

  • EAP Method: PEAP
  • Phase 2 authentication: Automatic
  • Server CA certificate: Do not check
  • Identity: (Your username)
  • Password: (Your Password)

Push Connect when finished

Instructions for iPadOS and iOS (iPad and iPhone)

Find the Settings App on your device and open it.

Tap on Wi-Fi, and then tap on the PCCSK12-Students if you are a student, and PCCSK12-Staff if you are a district staff member in the list of Wi-Fi networks

When prompted for a username and password, use your network logon credentials (username without @pccsk12.com at the end for students, network account for staff) to connect.

*Example:
Username: izcough872
Password: learnpow

Tap the Trust button when you see this window

You should see a check mark in the Wi-Fi list at the top that confirms you are connected.

Instructions for Android devices

Find the Settings App on your Android device then Tap on Network & Settings or on Wi-Fi. (The layout of the settings may differ with different types of Android devices)

Tap on the PCCSK12-Students if you are a student, and PCCSK12-Staff if you are a district staff member in the list of Wi-Fi networks. Use the following settings:

  • EAP Method: PEAP
  • Phase 2 authentication: None orMSCHAPV2
  • CA certificate: Do Not Validate or Trust on First Use
  • Domain: PCCSK12.com
  • Identity: (same as laptop login username)
  • Anonymous identity: leave blank
  • Password: (current laptop login password)

Instructions for Windows 10

Look for WiFi icon in the bottom right-hand corner of your desktop either by clicking directly on it, or looking for it with the up arrow icon.

Click WiFi Icon in system tray then click on the PCCSK12-Students if you are a student, and PCCSK12-Staff if you are a district staff member.

Click the Connect button

Fill in the following fields as seen in the screenshot to the left. Make sure to use your username (PCCS Google email address without the @pccsk12.com for students, network account for staff) in the top field and your password in the bottom field

Example Username: izcough875
Password: (Your password)
Click OK when finished

Instructions for macOS

Select the Wi-Fi Symbol in the Menu Bar.

Then choose PCCSK12-Students if you are a student, and PCCSK12-Staff if you are a district staff member.

Enter username and password, (same as your Google login without the @pccsk12.com for students, network account for staff) and select “Remember this network”

Choose the Continue button

If prompted, enter your personal Mac’s Username and Password and Select “Update Settings”

If you are prompted to update Zoom…

A new Zoom update has been recently released. For staff who might be using Zoom, especially to host meetings with students, please practice launching and hosting a Zoom meeting on your district laptop prior to video conferencing with students. If you have trouble with Zoom stating you need to update it, please do the following:

  • Go to the Company Portal and install Clean Zoom (This will remove all old versions of Zoom)

  • Wait until Clean Zoom has been installed

  • Go to https://zoom.us/support/download and download and install Zoom (This will install the latest version of Zoom)

Additionally, for those who don’t usually have Zoom meetings with students, that will in April, we suggest that you have students test joining your Zoom meetings prior to using them for class. Doing so will ensure that there are no issues with your Zoom meeting settings and that Zoom works correctly on student devices. Students can also test using Zoom by going to zoom.us/test.

MORE DETAILED GUIDANCE

Follow the steps below to complete the update. 

  1. Click on the Windows Start button on the bottom left of your taskbar start menu
  2.  In the search bar, search for Company Portal and open it
    1. When the Portal opens, search for Clean Zoom and install it; wait for it to be fully installed
    2. Copy and paste http://zoom.us/support/download into your browser to download the new version of Zoom 
    3. The download should appear on the top right of your Chrome browser bar; click on the arrow and then click on the download where download is
    4. It should start downloading and indicate that it was updated successfully
    5. You can confirm you are set by browsing to zoom.us/test.