Promoting Academic Integrity in an AI World

The website Transparency Support makes it easy for a teacher to make their expectations for AI use clear. It also help students disclose their usage. By checking a few boxes, teachers and students generate custom statements to define expectations or disclose usage, ready to copy directly into any assignment. Teachers might even bring it up in front of student to co-create parameters for an assignment. We have linked it in the P-CCS AI Guidance. While transparency is powerful, it is only a piece of this complex topic.

Academic dishonesty is often like speeding: a situational decision based on risk and reward rather than just character. Research on academic dishonesty suggests it is driven by opportunity and pressure. To address this, we must “redesign the road” by pairing psychological insights with practical tools like Transparency Support, the AI Usage Scale, and Proof of Positive Authorship to eliminate ambiguity.

The Psychology of Misconduct

Understanding the underlying drivers of cheating allows us to move from reactive policing to proactive prevention. Research highlights three critical factors:

The “Cheater’s Triangle”

According to Routine Activity Theory, misconduct isn’t random. It requires three elements: a motivated offender (stressed student), a suitable target (outsourcable assignment), and a missing guardian (lack of barriers). Effective guardianship involves “designing out” opportunities through personalized assessments rather than relying solely on proctoring.

factors contributing to academic dishonesty

The Calculation of Risk vs. Reward

Research on risk versus reward identifies a tipping point: cheating is rare on assignments worth 10% but spikes at 30%. To mitigate this, educators might consider prioritizing frequent, lower-stakes assessments to keep temptation low.

Practical Strategies

While psychology explains the why, specific tools provide the how for prevention. Cheating is deterred by Moral Alignment (internal values) and the teacher acting as a capable guardian. 

Moral Alignment

To cultivate Moral Alignment, the P-CCS AI Guidance recommends integrating AI literacy using resources like Michigan Virtual’s Student Guide to AI and Common Sense Media lessons (P-CCS AI Guidance). These tools help students build an internal ethical compass, which must be balanced with necessary external checks.

Capable Guardianship

Uncertainty often fuels misconduct. When rules are unclear, the line between resourcefulness and dishonesty blurs.

  • The AI Usage Scale: P-CCS AI Guidance recommends a standardized scale (e.g., “No AI” to “Full AI Collaboration”) to create a shared language. Students can simply check the “Level” to understand boundaries without deciphering complex policies.
  • Transparency Support: As a newly introduced resource, this website serves as the practical bridge between high-level policy and daily classroom instruction. While the Usage Scale sets the general “level,” the Transparency Support site provides the specific “rules of the road.” It functions as a centralized hub where educators can access and generate standardized language for their assignments, explicitly listing which tools are permitted (e.g., “Fixing grammar and spelling”) versus which actions are prohibited (e.g., “Adjusting tone”). By providing this level of granularity, it effectively removes the “gray area” where ambiguity often leads to accidental misconduct.
  • Proof of Positive Authorship (PPA) secures the process rather than relying on unreliable AI detectors. PPA empowers students to prove they did the work by emphasizing creation over the final product:
    • Version History: Using Google Docs to make the writing process visible. Use the SchoolAI extension to assist.
    • Scaffolded Drafts: Grading outlines and drafts, not just the final essay.
    • This eliminates “opportunity” by focusing on the process. However, educators must remain nuanced: version history isn’t foolproof (paid extensions can mimic typing) and legitimate accommodations (voice-to-text) can look suspicious. PPA should be a holistic conversation, not just a technical check.

Conclusion

Cheating is often a situational response, not just a character flaw. By combining lower-stakes assessments with the clarity of Transparency Support and the process-focus of Proof of Positive Authorship, we create environments where integrity is the most logical and rewarding path.

AI Help Statement  (generated from Transparency Support)

I used Gemini and NotebookLM to help me with organizing ideas, summarizing text, starting a rough draft, rewording, and creating visuals. I contributed by researching, curating resources, suggesting edits, rewording for clarity and voice, reorganizing the structure, rewriting to align with my goals, and collaborating with a colleague.

Canvas Speedgrader Updates

Let’s be honest: clicking through student submissions is rarely the highlight of a teacher’s day. We know that when you are grading 150 daily assignments, every single mouse click adds up.

Recently, you might have noticed some changes in SpeedGrader. While the interface looks cleaner, some of you have reported a major “speed bump”: hitting the “Enter” key after typing a grade no longer automatically advances you to the next student.

For our “power users” who used browser extensions (like Canvas Betterizer) to enable that feature, this feels like a step backward. But for those of you who have always manually clicked the “Next” arrow 150 times a day—we have a trick that is going to save you serious time.

Whether you are trying to fix your broken workflow or simply want to grade faster than ever before, here is everything you need to know to master the new SpeedGrader.

1. The Secret to Faster Grading: The ‘J’ Key

If you miss the days of auto-advancing, or if you never knew you could grade without touching your mouse, meet your new best friend: The ‘J’ Key.

Canvas has a built-in suite of keyboard shortcuts that are significantly faster than reaching for the mouse to click “Next.”

The “No-Mouse” Workflow:

  1. Type the score in the grade box. (Use the G shortcut to automatically navigate to the grade box)
  2. Press Enter (to save the score).
  3. Press ‘J’ on your keyboard.

Voila! You are instantly transported to the next student. Need to go back? Press ‘K’.

SpeedGrader Shortcut Cheat Sheet:

  • J = Next Student
  • K = Previous Student
  • G = Jump to Grade Box
  • C = Jump to Comment Box
  • R = Use Rubric

Pro-Tip: You can view all available shortcuts by clicking the Gear Icon in the top-left of SpeedGrader and selecting “Keyboard Shortcuts.”

New speedgrader shortcuts

2. Why the Change? (The Good Stuff)

This change isn’t just cosmetic; it is part of the “Performance and Usability Upgrades” which is now enabled by default. In exchange for learning the ‘J’ key, we get faster load times, better stability, and powerful new grading tools:

Richer Feedback (Math, Images & Links)

This is a huge win for math and science teachers. The Assignment Comment Editor has been upgraded to support:

  • Images: You can now paste an image directly into your feedback comments.
  • Math Equations: Use the equation editor to show students exactly where a calculation went wrong.
  • Course Links: Easily link students to a specific resource or page in your course for review.

Rubrics Are Ready When You Are

If you use rubrics, you know the pain of constantly clicking to open them. With this update, rubrics now automatically display in the traditional view, saving you that extra click on every single student.

Change Status Manually

Previously, if you wanted to mark a student as “Excused” or change a “Late” tag, you had to leave SpeedGrader. Now, the Submission Status is a simple drop-down menu right in the sidebar. You can instantly toggle between Missing, Late, Excused, or None without leaving your grading flow.

Speed & Organization

Under the hood, this update brings faster load times and better stability. On the surface, you get better organization, including:

  • A Multi-Select Sections filter (specify which sections you want displayed)
  • A clearer “No Submission” alert so you don’t waste time looking for missing files.
  • A Comment Library filter to find your saved comments faster.

The Bottom Line

Change is always tricky, especially when it messes with our muscle memory. But with the new ability to leave rich feedback and the speed of the ‘J’ key, this update is designed to make your grading life easier in the long run.

One More Update

You can also have more granular control of when scores and feedback are released to student in order to accomplish your goals. Now, you can plan exactly when students see their rubric scores and comments, whether that’s to start a dialogue before grades are finalized, or to hold feedback until a review session or moderation is complete. Read more about that from the Canvas blog.

Support for Semester/Quarter Transition in Canvas

checklist for semester transition

Mastering the Canvas Semester Transition: A Teacher’s Workflow Guide

The transition between semesters is more than an administrative checkpoint; it is a critical period for ensuring academic continuity, finalizing student records, and preserving the integrity of your course data. A smooth transition sets the stage for a successful start to the new term. This guide provides a sequential, phased workflow to help you manage the process efficiently and avoid common pitfalls.

The entire process is governed by a series of firm deadlines. Please review the following key dates carefully to plan your work accordingly.

Phase 1: Finalizing the Current Semester (S1/Q2)

Properly closing out the semester is a strategic process that involves managing two different “read-only” deadlines: one for students and one for teachers. This phase focuses on finalizing your gradebook and managing course access permissions before the system automatically transitions your courses into a permanent, read-only state. Understanding the interplay between these deadlines is key to avoiding issues with late or crossover work.

Teacher Access & Grading Responsibilities

Your primary responsibility during this phase is to complete all grading and course edits before the system locks your access.

  • Final Grading Deadline: All grading and edits for Semester 1/Quarter 2 courses must be completed by January 21, 2026, at 11:59pm.
  • Read-Only Implication: After this deadline, your S1/Q2 courses will become read-only. You will no longer be able to edit assignments or enter grades.
  • Challenge for Year-Long Courses: This deadline presents a unique challenge for year-long courses. If you anticipate needing to grade an S1 assignment after the January 22 deadline, you must update its due date to fall within the new semester before the S1 term officially ends.

Student Access & Submission Rules

Student access to course materials also changes during the transition, which can affect their ability to review content or submit late work.

  • Read-Only Access: Students will retain read-only access to their S1/Q2 courses after January 16, 2026, at 11:59pm.
    • It is critical to note that students will lose all access to view quiz questions or submit assignments after this term end date.
  • Nuance for Year-Long Courses: In a year-long course, students can still submit S1/Q2 assignments after the deadline if the availability dates permit. However, due to the grading window limits, you will be unable to grade these submissions in Canvas after January 21.

Completing these standard closing procedures is the first step, but the semester transition often involves handling special circumstances and exceptions.

Phase 2: Managing Special Circumstances and Crossover Assignments

The end of a semester often involves managing non-standard situations, such as accommodating late work or adjusting assignments that span across two terms. This section provides guidance on how to handle these exceptions.

Moving Assignments into the New Semester (S2/Q3)

If you have an assignment from S1/Q2 that you need to move into the new S2/Q3 grading period, you must act proactively before the system locks the assignment’s settings.

  1. Identify any S1/Q2 assignments in a year-long course that need to be graded after the S1 term ends.
  2. In Canvas, edit the assignment and adjust the due date (directions to bulk update due dates) to a date that falls within the S2/Q3 term.
  3. This action must be completed by the critical deadline of January 16.

Missing this deadline has a direct consequence: after January 16, you will be unable to change the due date yourself and will need to submit a tech support ticket to have the assignment updated.

Handling Late Submissions and Grade Changes

Be aware of a key technical limitation regarding grade synchronization between Canvas and MiStar after the term concludes.

  • Grade Passback Limitation: S1/Q2 grades will NOT pass back from Canvas to MiStar after the MiStar term ends and the grading window closes on January 21.
  • Required Action: If a student submits late work that results in a change to their final report card grade, you must work directly with your building’s records office to have the student’s report card manually updated.

Successfully managing these legacy issues from the old semester allows you to transition your focus to proactively setting up your new courses for success.

Phase 3: Preparing and Launching the New Semester (S2/Q3)

This phase shifts from closing out the past semester to actively preparing for the upcoming one. The following steps are essential for building a clean, well-organized, and accessible course environment for your new students.

Structuring Your New Course Content

Importing Content You can easily import content from courses taught in previous years to save time on setup.

Cross-Listing Sections If you teach multiple sections of the same course, cross-listing them in Canvas allows you to manage content and communication from a single master course, which can be a significant time-saver.

However, if you have a year-long course that you regret not cross-listing, the semester break may seem like a good time to do it. Be aware that this specific action carries a severe risk of students submissions and grades lost. Crosslisting Guide.

Controlling Student Access to Course Materials

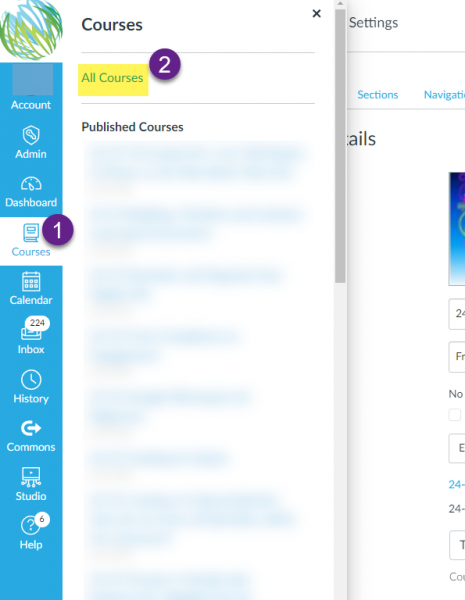
Past Courses You have control over whether students can see your past courses. This visibility can be adjusted in your Course Settings. If you allow a course to remain viewable, it will appear for students on their Courses page under the “Past Enrollments” section.

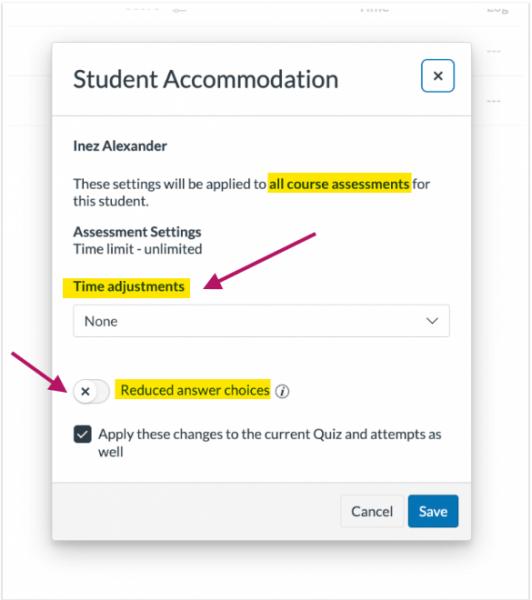
Read-Only Content Prep If you choose to keep past courses visible, it is wise to “prep” the course for read-only student access. This includes unpublishing materials you no longer want them to access, such as answer keys or solutions. It is important to remember that Quizzes are automatically not viewable by students after the term has ended, so no action is required for those items.

New Courses Even if published early, new S2/Q3 courses will not become visible to students until January 20. On that date, only courses you have explicitly published will be accessible.

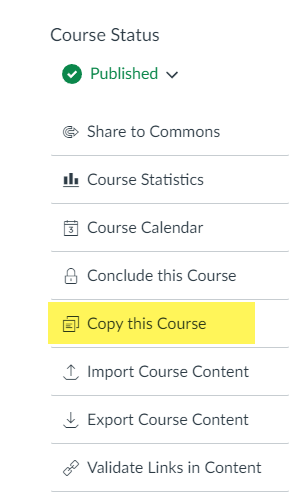
The Final Step: Publishing Your Course

Your new course must be published for students to see it. This is the final and most crucial step to ensure your course is live and accessible on the first day of the new semester.

You have now completed the setup process. The final checklist below serves as a tool to verify that all critical steps have been addressed.

Final Semester Transition Checklist

This checklist distills the guidance from this document into a set of concrete, actionable steps. Use it to confirm your readiness before, during, and after the semester transition.

Phase 1: Closing S1/Q2

  • [ ] Finalize all S1/Q2 grading before the 11:59pm deadline on January 21.
  • [ ] For year-long courses, update due dates for any S1 assignments that may need to be graded after January 21.

Phase 2: Managing Crossover

  • [ ] Move any S1/Q2 assignments to S2/Q3 by adjusting their due dates before January 16.
  • [ ] Note any late grade changes that will require coordination with the records office.

Phase 3: Launching S2/Q3

  • [ ] Import content from previous courses as needed.
  • [ ] Decide on and execute course cross-listing, acknowledging the data loss implications for year-long courses.
  • [ ] Adjust past course settings to control student viewability under “Past Enrollments.”
  • [ ] Unpublish sensitive materials (e.g., answer keys) in past courses made viewable to students.
  • [ ] Publish your new S2/Q3 course.

Navigating Canvas Quiz Accommodations

Navigating Canvas Quiz Accommodations blog post

Ensuring fair and accessible assessments often requires providing accommodations for individual student needs. Within Canvas’s New Quizzes, teachers have access to two distinct, yet complementary, tools for managing these adjustments in the Moderate tab: Course Accommodations and Current Quiz Accommodation. This post serves as a guide and reminder of how to effectively use these features. We will cover the specific function of each—from setting course-wide adjustments to handling single-quiz exceptions—and explain how they can work together.

Teachers can manage individual student needs for assessments by going to New Quizzes > Build > Moderate tab to access Course Accommodations (1) and Current Quiz Accommodation (2).

Edit pencil icon to set quiz moderation


Course Accommodations: Course-Wide Adjustments

Course Accommodations are used to apply specific time modifications to a student for all quizzes in the course. This is a set-it-and-forget-it feature, ideal for students with documented extended-time needs.

  • Applies to: All New Quizzes in the course.
  • Settings include: Adding/removing a specific amount of time, or applying a time limit multiplier (e.g., time), or reducing answer choices.
  • Rule: Only one course-level accommodation can be set per student.
  • How to access/View:  Click the Student’s Name in the Moderate tab within the New Quiz Build screen and your settings will be visible under the Accommodations column.

How do I add accommodations for a student in New Quizzes for all my course assessments?

    • course accommodations click name
student accommodations settings for time adjustments and reduced answer choices

Current Quiz Accommodation: Single-Quiz Control

Current Quiz Accommodation is used to make adjustments for an individual student on one specific quiz. This is your tool for handling one-off issues or exceptions.

  • Applies to: Only the quiz you are currently moderating.
  • Settings include:
    • Reopening a student’s most recent attempt (their previous responses are saved, and the timer resumes from where it left off).
    • Managing timer settings (adding a specific amount of time to all attempts, or removing the time limit entirely).
    • Granting extra attempts.
    • Reducing answer choices
  • Rule: Moderation timer settings apply to all attempts for the quiz in which they are set.
  • How to access/View: Click the Edit pencil icon in the Moderate tab within the New Quiz Build screen and your settings will be visible under the Accommodations column.

How do I moderate a student’s quiz attempt in New Quizzes for a single quiz?

quiz accommodations click pencil icon

current quiz accommodation menu


How Course and Current Quiz Accommodations Work Together

When a student has both a course accommodation and a current quiz accommodation applied, the settings stack:

  1. Course Accommodations are applied first.
  2. Current Quiz Accommodation settings are applied on top of the accommodation.
  3. Important: Moderation timer settings can never reduce the time granted by a course accommodation.

Critical Timing Note

Keep in mind that Quiz availability dates are the final authority. Even if you grant a student extended time, the quiz will auto-submit and close if the “Until” date passes while they are still working. Always ensure the “Until” date is wide enough to cover the maximum time any student (including those with accommodations) might need.

Currently, New Quizzes does not support bulk moderation, and student names will not be visible if anonymous grading is enabled.


Related Blog Post

There are a lot of moderation options in Canvas. Below you will find a resources on how students can resume a Quiz, moderating New and Classic Quizzes, and how to reopen an attempt for students.

Please submit a ticket if you have additional questions about this.


You may also view this collection of resources here: https://wke.lt/w/s/5aK43b

Prepping Your Canvas Course for the New School Year

We’re excited to let you know that your Canvas courses will soon be visible and ready for action. Canvas is designed to simplify your teaching journey and provide you with a user-friendly platform to engage with your students, organize course materials, and foster a dynamic learning environment.

Course Template

To assist you in creating an engaging and effective online learning space, we’ve prepared comprehensive resources for the course template. These resources include step-by-step guides, video tutorials, and best practices for setting up your Canvas courses. Whether you’re a seasoned Canvas user or a first-timer, these tools will ensure that you’re making the most of Canvas’s features. Using the Canvas template ensure students and families have a more consistent experience in Canvas.

locate all courses

Locating Courses from Past Years

Looking for courses from previous years? Rest assured, they may not be on your dashboard, but they are still there. If you navigate to https://pccsk12.instructure.com/courses and scroll to the bottom of the page, you’ll see such courses under “Past Enrollments.” Past enrollments (such courses) are in read-only format. If you would like to make some edits and updates to your course(s) for current or future usage do the following. Click on the course under Past Enrollments, go to Settings on the Course Navigation Menu and click the “Copy this Course” button.

copy course option

Import Previous Content

You can easily copy previous Canvas courses into your 25-26 course shell. However, if you have been keeping the same content from year to year, some unused content might be slowing you down. Below, you will find steps to import Canvas content into your new course shell (once generated automatically through the MiStar integration).

Getting Started with Canvas

Just getting started with Canvas or wanting to start anew? Check out this Canvas Quick Start Guide.  It has links to crosslisting directions, template homepage information, button templates, and more!

Crosslisting Guide

When you have taken time to update the homepage and import previous content, you might not want to repeat those steps for multiple sections on the same course. If that is the case, take a look at the crosslisting guide. This will allow you to only update one course and the changes will be reflected in all sections.

Publish Your Course(s)

You must publish your course in order for it to be visible for students and families. Rest assured, students cannot view course content until the term starts (check this under the course settings). Avoid unnecessary emails from students and families and set yourself a reminder to publish!

Canvas Studio Discontinued

As a reminder, Canvas Studio has been discontinued for the district. You have until November 30 to download videos and update videos linked via Studio in your course. Please note that the download option will not appear for videos that are connected to outside media resources, such as Youtube or Vimeo. Also, video quizzes will only download the video content and not quiz questions. Do NOT create new Canvas Studio content as it will not be available after November 30.

If you need assistance with any of these steps, please submit a tech ticket.

Tech-To-Do’s Year-End Checklist

summer break tech to-do

As you make plans to close up your classroom for the summer (and enjoy a well deserved break), please note and in some cases, take care of, the following items as the timing dictates:

  1. Save, Update, and Share Your Content

    1. Current Canvas courses will close and get placed in your past enrollments. However, there are considerations to check in the End of Year Canvas Post. Also note Canvas Studio is being Discontinued for 25-26 School Year. If you have videos currently stored in Canvas Studio that you wish to retain, you will need to download them by the end of August (see this blog post for more info).
    2. If you are leaving the district or hoping to collaborate with colleagues over the summer you might review this post: Sharing Digital Resources with Colleagues – P-CCSK12 Tech
    3. Clever: Staff and Students will have access to all clever resources throughout the summer. Clever syncing will be on pause starting on Monday June 10, 2025 giving student’s access to their 24-25 teacher’s pages and links until around mid-August when syncing will resume for the 25-26 school year. If you’re interested in learning how to make the most of Clever in your classroom, consider looking at training and ideas here.
    4. IXL: PCCS’s digital subscription for K-5 elementary students will continue throughout the summer. Students will have access to their NWEA skill plans (which were just updated with any spring scores) all summer. Students will have access to any current teacher starred skills through around mid-August, you might consider un-starring skills for students because they travel with students from year to year. Students in 5th grade currently will lose access around mid-August when syncing begins for the 25-26 school year as they will then be recognized as 6th graders.
    5. Edpuzzle: AFTER your grades have been transferred to the gradebook, it’s recommended that teachers delete their Edpuzzle classes. Issues can sometimes arise when Canvas courses that were integrated with Edpuzzle are copied from one year to the next. It is recommended that teachers delete their Edpuzzle classes before the new school year starts and new students join your classes. Please follow the directions in Edpuzzle’s Best Practices: Closing Out the School Year.
  2. Tech Housekeeping: Secure, Return, and Power Off (typically around the last day of school)

    1. Please comply with the directions of your principal and main office to turn in or secure all classroom technology equipment such as document cameras, microphones, interactive pens, and remotes.
    2. Please also secure or take home all District-assigned devices (laptop, Chromebook, iPad, etc.), as well as all personally-owned devices.
    3. Power off projectors/IFPs, sound amps, and desktop computers.
      1. You may leave printer and copiers plugged in and powered on
    4. Follow the care suggestions for classroom audio

Important Update: Canvas Studio Discontinued for 25-26 School Year

Canvas Studio discontinued

For Canvas users, please note this important change regarding Canvas Studio. Effective for the next school year, Canvas Studio will be discontinued.

This decision comes as we’ve recognized the abundance of powerful and versatile video creation and storage tools already available within our Google ecosystem. These tools offer similar, and in many cases, enhanced functionality compared to Canvas Studio. See, for example, our past blog posts about Google Vids and Screencast in Google Slides.

What This Means for You

If you have videos (made by you) currently stored in Canvas Studio that you wish to retain, you will need to download them. Otherwise they will be lost when our access ends at the end of August. We recommend saving these videos to your Google Drive, where they can be easily organized, accessed, and shared. Videos imported from YouTube or other sources cannot be downloaded.

Key Steps:

  1. Download Your Videos: Please download any videos you want to save from Canvas Studio by August 31, 2025. Our allocated storage of studio files will be cleared on September 1, 2025 and consequently none of our stored videos will be retrievable on, or after, that date. 
  2. Save to Google Drive: Store your downloaded videos in your Google Drive. Google Drive provides ample storage and integrates seamlessly with the tools you already use.

Link to detailed tutorial.

Important Note for Assignments:

Even though access to Canvas Studio is being discontinued, students will still be able to submit video assignments directly in Canvas. The standard Media Upload option within Canvas assignments will remain available, allowing students to record and submit videos as needed.

We understand this change may require some adjustments, and we are here to support you – if support is needed, please submit a help desk ticket.

Did You Know? — Canvas Outcomes

decorative title image

Tired of grades that feel more like a punishment than a reflection of learning? You’re not alone. Traditional grading practices often focus on points and compliance rather than mastery. But what if we could shift our focus to student growth and create a more equitable learning environment?

Enter Canvas Outcomes. This powerful feature within Canvas LMS allows teachers to define clear learning objectives, track student progress, and ensure that every child has the opportunity to demonstrate what they know.

Why Use Canvas Outcomes?

Canvas Outcomes provides a framework for aligning your instruction and assessment with specific learning goals. Here’s how it works:

  1. Define Learning Outcomes: Instead of just assigning points to assignments, identify the specific skills or knowledge you want students to acquire. These outcomes should be clear, measurable, and aligned with your standards.
    • Example: “Students will be able to analyze the main idea of a text and support it with evidence.”
  2. Align Assessments: Link your assignments, quizzes, and rubrics to these outcomes. This ensures that your assessments are directly measuring what students should be learning.
    • When creating a rubric, you can align specific criteria with an outcome, clearly showing students what they need to demonstrate.
  3. Track Student Progress: Canvas provides tools to monitor student progress toward mastery of each outcome. This data can inform your instruction and help you identify students who need additional support.
    • The Learning Mastery Gradebook provides a visual representation of student achievement for each outcome.
  4. Focus on Learning, Not Just Points: By aligning your grading with outcomes, you shift the focus from point accumulation to demonstrating mastery. This helps students see the purpose of their work and encourages them to take ownership of their learning.

Getting Started

Ready to give it a try? Here’s a step-by-step guide:

  1. Define Your Outcomes:
    • Go to the “Outcomes” section in your course.
    • Create your desired outcomes, ensuring they are specific and measurable.
  2. Align Outcomes with Assessments:
    • When creating or editing an assignment, quiz, or rubric, you can align it with the outcomes you’ve defined.
  3. Use the Learning Mastery Gradebook:
    • Enable the Learning Mastery Gradebook in your course settings.
    • Use this gradebook to monitor student progress on each outcome.
  4. Communicate with Students: Clearly explain the outcomes to your students and how their work will be assessed in relation to those outcomes.

Benefits

  • Increased Transparency: Outcomes make learning goals clear to both students and parents.
  • Improved Student Motivation: When students understand what they are working towards, they are more likely to be engaged.
  • Data-Driven Instruction: Canvas provides valuable data on student progress, allowing you to tailor your instruction to meet their needs.
  • More Equitable Grading: By focusing on mastery, you create a system that is more fair and less susceptible to bias.

Did You Know?

  • Canvas Outcomes can be aligned not only to individual assignments but also to entire rubrics, allowing for a more holistic assessment of student learning.
  • The Learning Mastery Gradebook can be customized to display different levels of achievement, such as “Exceeds Expectations,” “Meets Expectations,” and “Does Not Meet Expectations,” providing a more nuanced view of student progress.
  • Outcomes can be shared across courses and departments, promoting consistency and alignment in learning goals across the institution. Reach out to a TIS for more information on how we can support Outcome sharing.

Take the First Step

Integrating Canvas Outcomes into your classroom may seem daunting at first, but the shift towards focusing on learning objectives is well worth the effort. Start small, focus on one or two key outcomes, and gradually expand your use of this powerful tool.

Spring Canvas Updates

This week Canvas released a few updates, mostly regarding Canvas New Quizzes.

new quiz moderate enhancements

  • In the Activity Log, instructors can view the Client IP address, Browser Session ID, for each question of a quiz. This update provides instructors with greater visibility into quiz activity, helping them verify student engagement and identify potential irregularities during quiz attempts.

new quizzes breadcrumbs

  • When building a quiz in New Quizzes the Course Navigation and breadcrumbs display. Additionally, the Moderate tab and Reports tab are switched in the Quiz Menu. This update improves navigation and streamlines the quiz-building experience by providing consistent access to key tools.

student accommodations update

  • Several updates to the New Quizzes Moderate Page enhance the instructor’s ability to manage accommodations during active quiz attempts:
    • Instructors can add time to an active quiz attempt when moderating a New Quiz.
    • In the New Quizzes Moderate Page:
      • The modal is renamed to Student Accommodation.
      • The student’s name is relocated to the body text.
      • A checkbox is added to apply changes to the current quiz attempt.
    • The Moderation tray is renamed to In Progress Accommodation and includes the student’s name in the body text.

    Note: The Apply these changes to the current Quiz and attempts as well checkbox is enabled by default.


Enhanced Rubrics

Canvas has been working on improving the rubric experience. They have added some functionality to make building and adjusting rubric easier. We have not yet turned on this updated functionality and are looking for feedback from heavy Canvas Rubric users about what they think and when we should turn it on in our district. One exciting reason to enable it is that students can now self-asses with the rubrics added to an assignment.

Please reach out to your TIS if you have an opinion about turning it on and if you would like a preview of the new experience.

Canvas New Quizzes Update: Multiple Selections in Hot Spot Questions

creating multiple hot spots

Summary

Instructors can enable multiple selections in Hot Spot quiz questions:

  • Instructors can define multiple correct hot spot areas.
  • Students can select multiple areas on an image in response to the quiz.
  • Autograding will evaluate the student’s selections based on the defined correct answers.
  • The feature supports regrading functionality.
  • User response attempts are limited to the number of hotspots set by the instructor.

Note: Questions made before this change support editing to accept multiple hotspots.

This update will be deployed on March 26, 2025.