Some teachers are currently experiencing an issue where their classes are not appearing in Classwize. The technology department is aware of the situation and is working directly with the company to resolve this as quickly as possible. Thank you for your patience and understanding as we work toward a resolution.
Two Helpful Chrome Updates: Reading Mode and Split View
Google Chrome recently introduced two features that significantly streamline digital workflows in the classroom: Reading Mode and Split View. These tools are designed to reduce visual clutter and simplify multitasking, making digital content more accessible for both teachers and students.
Enhancing Focus with Reading Mode
Online articles are often crowded with ads, sidebars, and autoplay videos that distract students. Reading Mode creates a simplified environment focused exclusively on the text.
Key Functionality:
Beyond stripping away distractions, Reading Mode includes a robust Read Aloud feature. Chrome can narrate the text while highlighting words in real-time, providing essential support for:
- Differentiated Instruction: Supporting students who process information better auditorily.
- Literacy Support: Helping emergent readers and ELL students connect spoken and written language.
- Accessibility: Providing a cleaner interface for students with dyslexia or visual impairments.
How to Use It:
- Right-click anywhere on a webpage.
- Select “Open in reading mode” from the menu.
- A side panel will open with the text. Use the toolbar to adjust narration speed, voice type, and text size.
Streamlining Multitasking with Split View
Managing multiple open tabs is a challenge during research or grading. Split View allows you to display two different pages side-by-side within a single browser window without the need for manual resizing.
Key Applications in the Classroom:
- Research & Synthesis: Students can view a primary source on one side and a note-taking document on the other.
- Efficient Grading: Keep a grading rubric visible on one side while reviewing student submissions.
- Lesson Planning: Reference curriculum standards while building out a slide deck.
How to Use It: There are three primary ways to activate Split View:
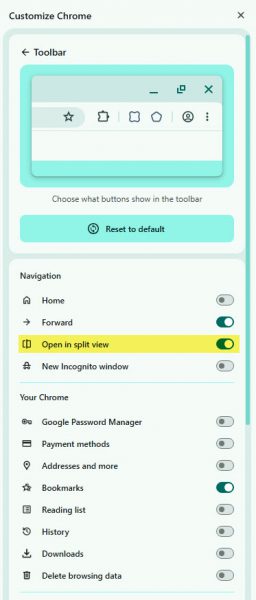
- Enable the Toolbar Icon: Click the 3 dots in the upper left corner in Chrome. Select more tools, then Customize Chrome. Enable the “Open in split view” option. This button will appear between the Refresh button and Omnibox/URL bar.
- Drag and Drop: Click and drag an existing tab to the far left or right edge of the Chrome window until a highlight appears, then release to snap it into place.
- Right-Click: Right-click any link and select “Open link in split view” to immediately view it alongside your current page.
We encourage you to try these workflows in your next lesson.
Promoting Academic Integrity in an AI World
The website Transparency Support makes it easy for a teacher to make their expectations for AI use clear. It also help students disclose their usage. By checking a few boxes, teachers and students generate custom statements to define expectations or disclose usage, ready to copy directly into any assignment. Teachers might even bring it up in front of student to co-create parameters for an assignment. We have linked it in the P-CCS AI Guidance. While transparency is powerful, it is only a piece of this complex topic.
Academic dishonesty is often like speeding: a situational decision based on risk and reward rather than just character. Research on academic dishonesty suggests it is driven by opportunity and pressure. To address this, we must “redesign the road” by pairing psychological insights with practical tools like Transparency Support, the AI Usage Scale, and Proof of Positive Authorship to eliminate ambiguity.
The Psychology of Misconduct
Understanding the underlying drivers of cheating allows us to move from reactive policing to proactive prevention. Research highlights three critical factors:
The “Cheater’s Triangle”
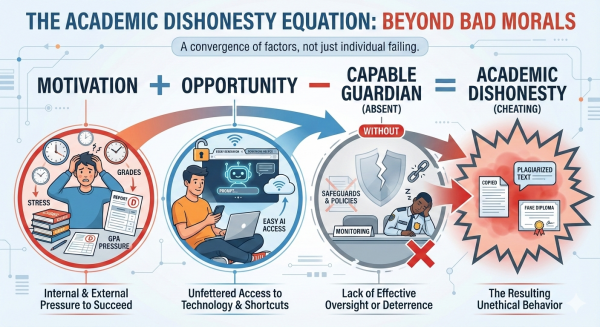
According to Routine Activity Theory, misconduct isn’t random. It requires three elements: a motivated offender (stressed student), a suitable target (outsourcable assignment), and a missing guardian (lack of barriers). Effective guardianship involves “designing out” opportunities through personalized assessments rather than relying solely on proctoring.
The Calculation of Risk vs. Reward
Research on risk versus reward identifies a tipping point: cheating is rare on assignments worth 10% but spikes at 30%. To mitigate this, educators might consider prioritizing frequent, lower-stakes assessments to keep temptation low.
Practical Strategies
While psychology explains the why, specific tools provide the how for prevention. Cheating is deterred by Moral Alignment (internal values) and the teacher acting as a capable guardian.
Moral Alignment
To cultivate Moral Alignment, the P-CCS AI Guidance recommends integrating AI literacy using resources like Michigan Virtual’s Student Guide to AI and Common Sense Media lessons (P-CCS AI Guidance). These tools help students build an internal ethical compass, which must be balanced with necessary external checks.
Capable Guardianship
Uncertainty often fuels misconduct. When rules are unclear, the line between resourcefulness and dishonesty blurs.
- The AI Usage Scale: P-CCS AI Guidance recommends a standardized scale (e.g., “No AI” to “Full AI Collaboration”) to create a shared language. Students can simply check the “Level” to understand boundaries without deciphering complex policies.
- Transparency Support: As a newly introduced resource, this website serves as the practical bridge between high-level policy and daily classroom instruction. While the Usage Scale sets the general “level,” the Transparency Support site provides the specific “rules of the road.” It functions as a centralized hub where educators can access and generate standardized language for their assignments, explicitly listing which tools are permitted (e.g., “Fixing grammar and spelling”) versus which actions are prohibited (e.g., “Adjusting tone”). By providing this level of granularity, it effectively removes the “gray area” where ambiguity often leads to accidental misconduct.
- Proof of Positive Authorship (PPA) secures the process rather than relying on unreliable AI detectors. PPA empowers students to prove they did the work by emphasizing creation over the final product:
-
- Version History: Using Google Docs to make the writing process visible. Use the SchoolAI extension to assist.
- Scaffolded Drafts: Grading outlines and drafts, not just the final essay.
- This eliminates “opportunity” by focusing on the process. However, educators must remain nuanced: version history isn’t foolproof (paid extensions can mimic typing) and legitimate accommodations (voice-to-text) can look suspicious. PPA should be a holistic conversation, not just a technical check.
Conclusion
Cheating is often a situational response, not just a character flaw. By combining lower-stakes assessments with the clarity of Transparency Support and the process-focus of Proof of Positive Authorship, we create environments where integrity is the most logical and rewarding path.
AI Help Statement (generated from Transparency Support)
I used Gemini and NotebookLM to help me with organizing ideas, summarizing text, starting a rough draft, rewording, and creating visuals. I contributed by researching, curating resources, suggesting edits, rewording for clarity and voice, reorganizing the structure, rewriting to align with my goals, and collaborating with a colleague.
Canvas Speedgrader Updates
Let’s be honest: clicking through student submissions is rarely the highlight of a teacher’s day. We know that when you are grading 150 daily assignments, every single mouse click adds up.
Recently, you might have noticed some changes in SpeedGrader. While the interface looks cleaner, some of you have reported a major “speed bump”: hitting the “Enter” key after typing a grade no longer automatically advances you to the next student.
For our “power users” who used browser extensions (like Canvas Betterizer) to enable that feature, this feels like a step backward. But for those of you who have always manually clicked the “Next” arrow 150 times a day—we have a trick that is going to save you serious time.
Whether you are trying to fix your broken workflow or simply want to grade faster than ever before, here is everything you need to know to master the new SpeedGrader.
1. The Secret to Faster Grading: The ‘J’ Key
If you miss the days of auto-advancing, or if you never knew you could grade without touching your mouse, meet your new best friend: The ‘J’ Key.
Canvas has a built-in suite of keyboard shortcuts that are significantly faster than reaching for the mouse to click “Next.”
The “No-Mouse” Workflow:
- Type the score in the grade box. (Use the G shortcut to automatically navigate to the grade box)
- Press Enter (to save the score).
- Press ‘J’ on your keyboard.
Voila! You are instantly transported to the next student. Need to go back? Press ‘K’.
SpeedGrader Shortcut Cheat Sheet:
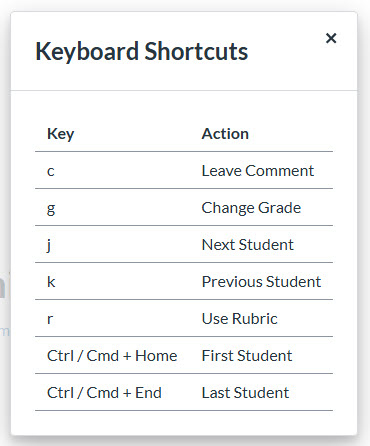
- J = Next Student
- K = Previous Student
- G = Jump to Grade Box
- C = Jump to Comment Box
- R = Use Rubric
Pro-Tip: You can view all available shortcuts by clicking the Gear Icon in the top-left of SpeedGrader and selecting “Keyboard Shortcuts.”
2. Why the Change? (The Good Stuff)
This change isn’t just cosmetic; it is part of the “Performance and Usability Upgrades” which is now enabled by default. In exchange for learning the ‘J’ key, we get faster load times, better stability, and powerful new grading tools:
Richer Feedback (Math, Images & Links)
This is a huge win for math and science teachers. The Assignment Comment Editor has been upgraded to support:
- Images: You can now paste an image directly into your feedback comments.
- Math Equations: Use the equation editor to show students exactly where a calculation went wrong.
- Course Links: Easily link students to a specific resource or page in your course for review.
Rubrics Are Ready When You Are
If you use rubrics, you know the pain of constantly clicking to open them. With this update, rubrics now automatically display in the traditional view, saving you that extra click on every single student.
Change Status Manually
Previously, if you wanted to mark a student as “Excused” or change a “Late” tag, you had to leave SpeedGrader. Now, the Submission Status is a simple drop-down menu right in the sidebar. You can instantly toggle between Missing, Late, Excused, or None without leaving your grading flow.
Speed & Organization
Under the hood, this update brings faster load times and better stability. On the surface, you get better organization, including:
- A Multi-Select Sections filter (specify which sections you want displayed)
- A clearer “No Submission” alert so you don’t waste time looking for missing files.
- A Comment Library filter to find your saved comments faster.
The Bottom Line
Change is always tricky, especially when it messes with our muscle memory. But with the new ability to leave rich feedback and the speed of the ‘J’ key, this update is designed to make your grading life easier in the long run.
One More Update
You can also have more granular control of when scores and feedback are released to student in order to accomplish your goals. Now, you can plan exactly when students see their rubric scores and comments, whether that’s to start a dialogue before grades are finalized, or to hold feedback until a review session or moderation is complete. Read more about that from the Canvas blog.
Edpuzzle Office Hours
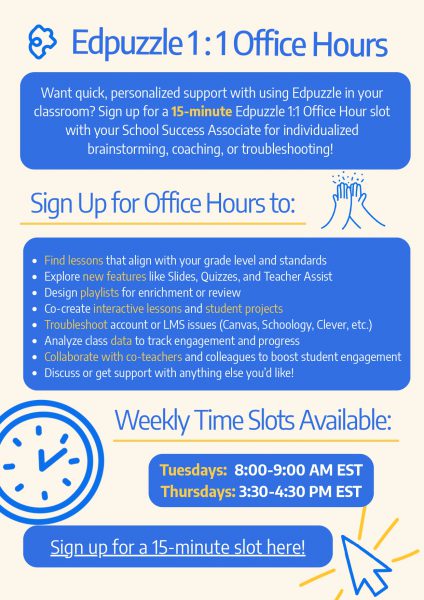
Interested in using Edpuzzle? Were you a big fan of Canvas Studio and want to find out how Edpuzzle serves as a good substitute. Edpuzzle is now offering free 15 minute one-on-ones where teachers can…
- Ask questions
- Get help finding lessons
- Get help creating lessons
- Troubleshoot account issues
- Talk all things Edpuzzle
Sign-up here.
Support for Semester/Quarter Transition in Canvas
Mastering the Canvas Semester Transition: A Teacher’s Workflow Guide
The transition between semesters is more than an administrative checkpoint; it is a critical period for ensuring academic continuity, finalizing student records, and preserving the integrity of your course data. A smooth transition sets the stage for a successful start to the new term. This guide provides a sequential, phased workflow to help you manage the process efficiently and avoid common pitfalls.
The entire process is governed by a series of firm deadlines. Please review the following key dates carefully to plan your work accordingly.
Phase 1: Finalizing the Current Semester (S1/Q2)
Properly closing out the semester is a strategic process that involves managing two different “read-only” deadlines: one for students and one for teachers. This phase focuses on finalizing your gradebook and managing course access permissions before the system automatically transitions your courses into a permanent, read-only state. Understanding the interplay between these deadlines is key to avoiding issues with late or crossover work.
Teacher Access & Grading Responsibilities
Your primary responsibility during this phase is to complete all grading and course edits before the system locks your access.
- Final Grading Deadline: All grading and edits for Semester 1/Quarter 2 courses must be completed by January 21, 2026, at 11:59pm.
- Read-Only Implication: After this deadline, your S1/Q2 courses will become read-only. You will no longer be able to edit assignments or enter grades.
- Challenge for Year-Long Courses: This deadline presents a unique challenge for year-long courses. If you anticipate needing to grade an S1 assignment after the January 22 deadline, you must update its due date to fall within the new semester before the S1 term officially ends.
Student Access & Submission Rules
Student access to course materials also changes during the transition, which can affect their ability to review content or submit late work.
- Read-Only Access: Students will retain read-only access to their S1/Q2 courses after January 16, 2026, at 11:59pm.
- It is critical to note that students will lose all access to view quiz questions or submit assignments after this term end date.
- Nuance for Year-Long Courses: In a year-long course, students can still submit S1/Q2 assignments after the deadline if the availability dates permit. However, due to the grading window limits, you will be unable to grade these submissions in Canvas after January 21.
Completing these standard closing procedures is the first step, but the semester transition often involves handling special circumstances and exceptions.
Phase 2: Managing Special Circumstances and Crossover Assignments
The end of a semester often involves managing non-standard situations, such as accommodating late work or adjusting assignments that span across two terms. This section provides guidance on how to handle these exceptions.
Moving Assignments into the New Semester (S2/Q3)
If you have an assignment from S1/Q2 that you need to move into the new S2/Q3 grading period, you must act proactively before the system locks the assignment’s settings.
- Identify any S1/Q2 assignments in a year-long course that need to be graded after the S1 term ends.
- In Canvas, edit the assignment and adjust the due date (directions to bulk update due dates) to a date that falls within the S2/Q3 term.
- This action must be completed by the critical deadline of January 16.
Missing this deadline has a direct consequence: after January 16, you will be unable to change the due date yourself and will need to submit a tech support ticket to have the assignment updated.
Handling Late Submissions and Grade Changes
Be aware of a key technical limitation regarding grade synchronization between Canvas and MiStar after the term concludes.
- Grade Passback Limitation: S1/Q2 grades will NOT pass back from Canvas to MiStar after the MiStar term ends and the grading window closes on January 21.
- Required Action: If a student submits late work that results in a change to their final report card grade, you must work directly with your building’s records office to have the student’s report card manually updated.
Successfully managing these legacy issues from the old semester allows you to transition your focus to proactively setting up your new courses for success.
Phase 3: Preparing and Launching the New Semester (S2/Q3)
This phase shifts from closing out the past semester to actively preparing for the upcoming one. The following steps are essential for building a clean, well-organized, and accessible course environment for your new students.
Structuring Your New Course Content
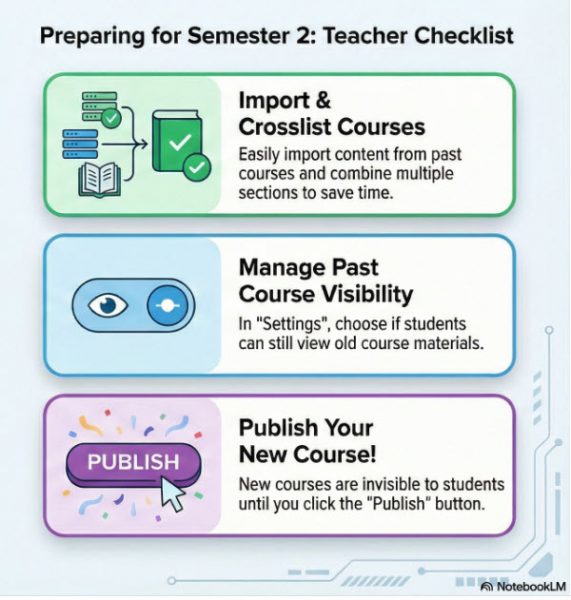
Importing Content You can easily import content from courses taught in previous years to save time on setup.
Cross-Listing Sections If you teach multiple sections of the same course, cross-listing them in Canvas allows you to manage content and communication from a single master course, which can be a significant time-saver.
However, if you have a year-long course that you regret not cross-listing, the semester break may seem like a good time to do it. Be aware that this specific action carries a severe risk of students submissions and grades lost. Crosslisting Guide.
Controlling Student Access to Course Materials
Past Courses You have control over whether students can see your past courses. This visibility can be adjusted in your Course Settings. If you allow a course to remain viewable, it will appear for students on their Courses page under the “Past Enrollments” section.
Read-Only Content Prep If you choose to keep past courses visible, it is wise to “prep” the course for read-only student access. This includes unpublishing materials you no longer want them to access, such as answer keys or solutions. It is important to remember that Quizzes are automatically not viewable by students after the term has ended, so no action is required for those items.
New Courses Even if published early, new S2/Q3 courses will not become visible to students until January 20. On that date, only courses you have explicitly published will be accessible.
The Final Step: Publishing Your Course
Your new course must be published for students to see it. This is the final and most crucial step to ensure your course is live and accessible on the first day of the new semester.
You have now completed the setup process. The final checklist below serves as a tool to verify that all critical steps have been addressed.
Final Semester Transition Checklist
This checklist distills the guidance from this document into a set of concrete, actionable steps. Use it to confirm your readiness before, during, and after the semester transition.
Phase 1: Closing S1/Q2
- [ ] Finalize all S1/Q2 grading before the 11:59pm deadline on January 21.
- [ ] For year-long courses, update due dates for any S1 assignments that may need to be graded after January 21.
Phase 2: Managing Crossover
- [ ] Move any S1/Q2 assignments to S2/Q3 by adjusting their due dates before January 16.
- [ ] Note any late grade changes that will require coordination with the records office.
Phase 3: Launching S2/Q3
- [ ] Import content from previous courses as needed.
- [ ] Decide on and execute course cross-listing, acknowledging the data loss implications for year-long courses.
- [ ] Adjust past course settings to control student viewability under “Past Enrollments.”
- [ ] Unpublish sensitive materials (e.g., answer keys) in past courses made viewable to students.
- [ ] Publish your new S2/Q3 course.
WayneRESA’s January EdTech Updates newsletter
Wayne RESA’s January EdTech Updates brings you the latest news, tech tips, and professional learning opportunities in educational technology that they are aware of or are coordinating. Some staff may want to check out their offerings.
Two are shown below:
MISTAR-Q Training: MISTAR-Q Academy for Teachers
Registration is open for
MISTAR-Q ACADEMY for Teachers
Spring Session – Jan 19 to Apr 13, 2026
Teachers are invited to participate in MISTAR-Q Academy for Teachers, a FREE training to hone MISTAR skills.
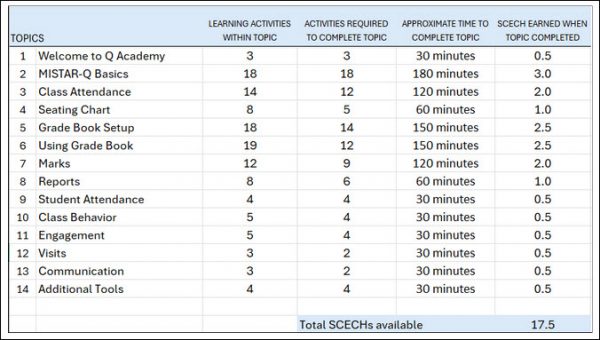
Working online at your own pace, you will complete activities designed to increase your skills and knowledge of teacher apps including Class Attendance, Grade Book, Seating Chart, reports, and more. This course is especially beneficial for teachers new to MISTAR-Q.
You may earn between 1.0 and 17.5 SCECHs, depending on which topics you complete by the end of this 12-week course. At least two topics must be completed to qualify for SCECHs.
Should I register for MISTAR-Q Academy if I previously participated in Monarch?
If you completed Monarch, you completed all content in MISTAR-Q Academy. If you participated in Monarch but did not complete the course, you are welcome to register, but your progress will not transfer from the old Monarch course.
Register here – after registering, watch for emails by Jan 19 with details on how to get started. Registration fee is FREE / $0.
Please note, this course is offered twice (fall and spring) each academic year.
New Feature: SchoolAI Browser Extension Now Available!
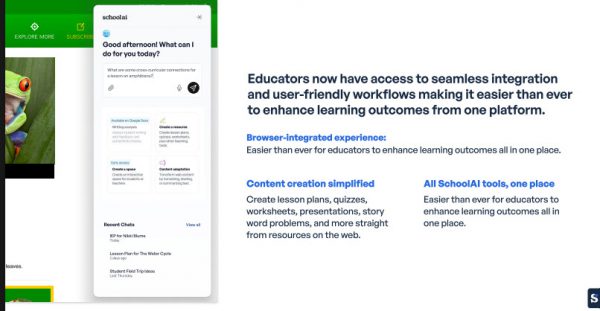
The SchoolAI Browser Extension is now available for teachers only (not students). It is your digital teaching ally, integrating AI directly into your existing workflow. Instead of switching tabs, access powerful tools while browsing articles, watching YouTube, or providing feedback in Google Docs.
If you haven’t tried SchoolAI yet, this browser extension makes its features even easier to access.
1. Core Features: AI Where You Work
The extension is an integrated assistant that understands your classroom context.
Writing Analysis in Google Docs
- Targeted Feedback: Upload rubrics or standards to generate personalized comments aligned with your grading criteria.
- Revision History Viewer: See a Google Doc’s full revision history, including edits and authorship, to understand how it was written.
- Instant Summaries: Generate high-level overviews at the top of a document to help your students see the big picture of their drafts.
Create a Resource from any Website
Stop manual copy-pasting. Use the “Create a Resource” tool to:
- YouTube to Activity: Generate guided notes, reflection questions, or quizzes directly from a video’s transcript.
- Interactive Sidebar: Ask questions about any webpage—such as “generate five discussion questions”—without leaving the site.
Content Adaptation
Meet students exactly where they are by adapting any webpage in real-time:
- Adjust Reading Levels: Instantly rewrite complex text (like NASA articles) for specific grade levels while preserving core facts.
- Language Support: Bridge gaps for ELL students by translating web text or generating vocabulary lists with definitions in their native language.
Create a Space from Any Page (Early Access)
The extension can transform static content into an interactive SchoolAI Space:
- Contextual Spaces: Click “Create Space” on any article or primary source to build an AI-led chat environment based on that specific content.
- Instant Tutoring: Students enter a Space where the AI acts as a tutor or historical figure knowledgeable about the webpage.
- Seamless Sharing: Launch a Space and get a code or link to share with students immediately.
2. Privacy & Security
Student safety is a priority. SchoolAI is FERPA and COPPA compliant. Data is protected, never sold, and used strictly for educational functions. Our district agreement ensures our P-CCS data is never used to train external AI models.
3. Get Started in Minutes
- Install: The extension will be pushed automatically to your P-CCS Google account soon. But if you want it now, go here to install it from the Chrome Web Store.
- Sign In: Use your Google credentials to activate your account.
- Teach: Open any Google Doc or website and click the SchoolAI icon to begin.
Once installed, the extension should appear in your Chrome toolbar automatically and you will see a floating SchoolAI “S” icon on the right side of the browser. Simply click the icon and sign in with your Google credentials to begin. (Click the X to hide the floating icon on this site or on all sites. Click and drag on the six gray dots to move the icon.)
Check out this YouTube Playlist to learn how to use many of the features of the SchoolAI extension.
Use the SchoolAI Space for a personalized step-by-step guide to get started.
The SchoolAI extension gives you back your most valuable resource: time. By automating routine tasks, it allows you to focus on the personal connections and “lightbulb moments” that define great teaching.
Microsoft Office 365 desktop apps access truly ending for any still using those apps
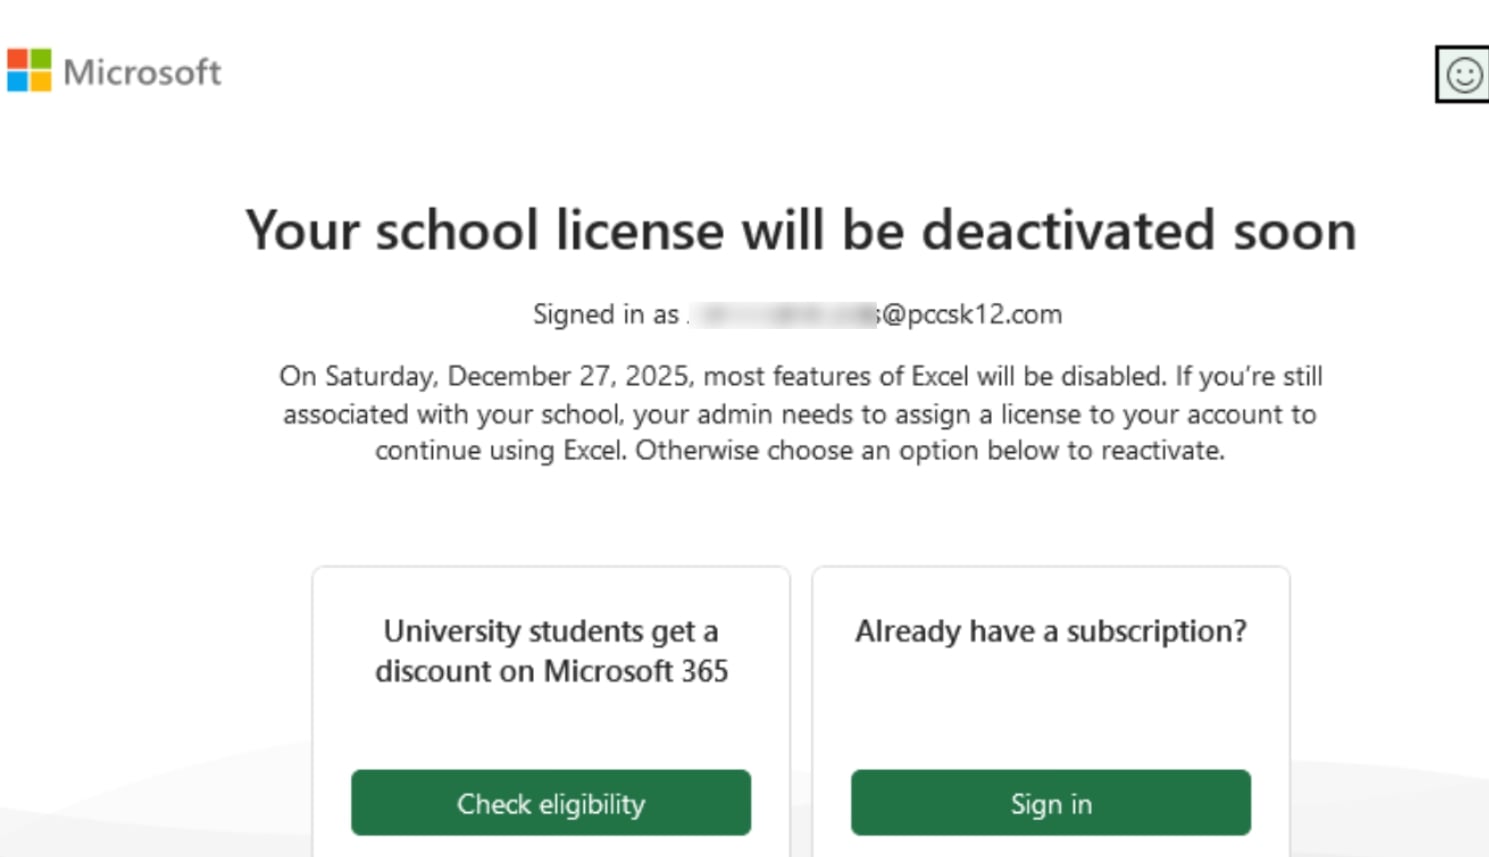
Last year we posted news that Microsoft had notified our district that they would be ending our access to Microsoft Office 365 desktops apps when they retired our licensing program (Office 365 A1 Plus) on August 1, 2024. Their announcement impacted all school districts with the same licensing. While they stated that after August 1st, 2024, anyone that had downloaded and installed Office 365 versions of Word, Excel, and PowerPoint would find those programs no longer work, some staff found that they actually could still use them AND only now, more than a year later, are encountering notice that their access to the apps are definitely going away later this month. Microsoft has revoked our A1 Plus licenses within our system, prompting those notices.
So fortunately, some users enjoyed a bonus grace period of better than a year, but from our department’s perspective, regrettably, that is coming to an end. As we shared in our other blog post, here are some options for impacted staff:
- Use the Google Workspace for Apps (Recommended). As a Google Workshop for Education district, it is strongly recommended that staff use Google Docs, Sheets, Slides, etc. All of these apps (and more) are available through Google Drive.
- You can still use Microsoft Office 365 online since that licensing remains. Browse to portal.office.com and sign in using your email address and network (not Google) password. All files created using the desktop apps can be open and edited within the online suite.
- Use a free office suite alternative, such as Libre Office, which is available in the Company Portal for those that want to download and have installed a desktop office suite. Libre Office is highly compatible with Microsoft Office documents. It can open and edit all of the Microsoft Office file formats, as well as save in those same file formats. See this video guidance for how to set it up to natively load and save in Office formats.
- Departments/schools interested in purchasing licensing for Office 2024 for one or more of their staff can submit a service request so our department can work with the requester on their purchase and our installation. Current REMC pricing for Office Standard runs through June 2027.


