As instructional staff make plans to close up your classrooms for the summer (and enjoy a well deserved break), please take care of the following items as needed
-
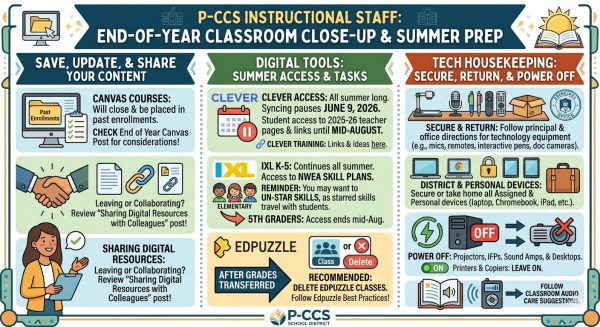
Save, Update, and Share Your Content
- Current Canvas courses will close and get placed in your past enrollments. However, there are considerations to check in the End of Year Canvas Post.
- If you are leaving the district or hoping to collaborate with colleagues over the summer you might review this post: Sharing Digital Resources with Colleagues – P-CCSK12 Tech
- Clever: Staff and Students will have access to all Clever resources throughout the summer. Clever syncing will be on pause starting on Tuesday June 9, 2026 giving student’s access to their 2025-26 teacher’s pages and links until around mid-August when syncing will resume for the 26-27 school year. If you’re interested in learning how to make the most of Clever in your classroom, consider looking at training and ideas here.
- IXL: PCCS’s digital subscription for K-5 elementary students will continue throughout the summer. Students will have access to their NWEA skill plans (which were just updated with any spring scores) all summer. Students will have access to any current teacher starred skills through around mid-August, you might consider un-starring skills for students because they travel with students from year to year. Students in 5th grade currently will lose access around mid-August when syncing begins for the 2026-27 school year as they will then be recognized as 6th graders.
- Edpuzzle: AFTER your grades have been transferred to the gradebook, it’s recommended that teachers delete their Edpuzzle classes. Issues can sometimes arise when Canvas courses that were integrated with Edpuzzle are copied from one year to the next. It is recommended that teachers delete their Edpuzzle classes before the new school year starts and new students join your classes. Please follow the directions in Edpuzzle’s Best Practices: Closing Out the School Year.
-
Tech Housekeeping: Secure, Return, and Power Off (typically around the last day of school)
- Please comply with the directions of your principal and main office to turn in or secure all classroom technology equipment such as document cameras, microphones, interactive pens, and remotes.
- Please also secure or take home all District-assigned devices (laptop, Chromebook, iPad, etc.), as well as all personally-owned devices.
- Power off projectors/IFPs, sound amps, and desktop computers.
- You may leave printer and copiers plugged in and powered on
- Follow the care suggestions for classroom audio.