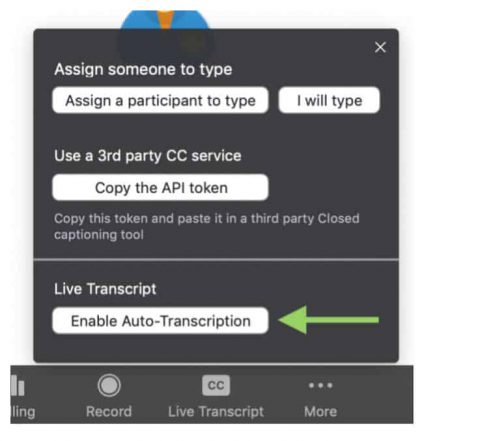
Closed captions are an essential accessibility tool for people who are deaf or hard of hearing (and for people with other conditions as well). Captioning is also a useful feature for many students as an additional representation of information in a virtual setting. Previously in Zoom, closed captioning was only available from third party providers or by assigning someone to type captions. Now automatic, live transcription of closed captions is an available feature in the Zoom desktop client (not the Chrome browser application). Once enabled, this automatically adds text to the bottom of the video with what the host and others are saying. Please note however, live transcription does not work in breakout rooms, only within the main session.
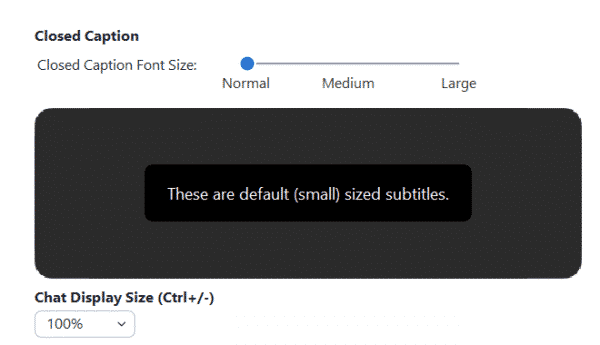
When closed captioning is enabled, as the host you will see the live-transcript below your video, but they DO NOT automatically appear for your participants. Instead, participants will receive a notification and must click the “Closed Caption” option in the menu bar (and usually click Show Subtitle) to start viewing the captions. Once they have done so, the size of the captions can be adjusted under “Accessibility” in the video settings.
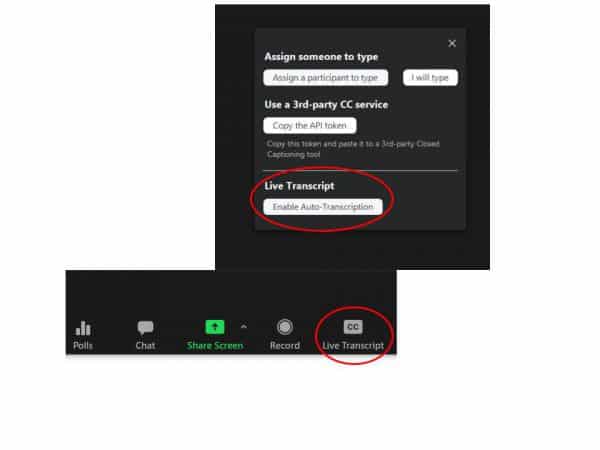
Elaborating on the CC options:
- Show Subtitles – Displays captioning on the bottom of the video. You can also select Hide Subtitle once subtitles are selected to hide them.
- View Full Transcript – Opens a panel/pop-up and displays captions in real-time with both the speaker’s name and time stamp. In that pop-up, participants will also see a button to save the transcript (this button might not be available if the host has disabled this functionality). If enabled, click Save Transcript. A copy of the transcript as a .txt file will be downloaded to your machine.
Note: Transcripts save up to the moment when you click Save Transcript. If you click Save Transcript multiple times throughout the event, it will overwrite/update the existing file. We recommend clicking Save Transcript just before the meeting ends to ensure you have the transcript from the entire meeting. There is no option to auto-save these transcripts.
Bear in mind:
- Speak slowly, it will help the system capture the words you are saying
- If there are any loud disruptions (i.e. cars outside or school bells) pause and hold your thoughts until the noise passes.
If you are hosting a meeting with live-transcription, we recommend making a comment at the beginning of your meeting informing your meeting participants that live-transcription is available and a note about how to enable them. Encourage all your students to try turning the captions on to see if it has an impact on their comprehension or capacity to pay attention. Make it a best UDL (Universal Design for Learning) practice to enable closed captioning during all of your meetings.
For more information on UDL and closed captioning, please read this article.