Google Chrome recently introduced two features that significantly streamline digital workflows in the classroom: Reading Mode and Split View. These tools are designed to reduce visual clutter and simplify multitasking, making digital content more accessible for both teachers and students.
Enhancing Focus with Reading Mode
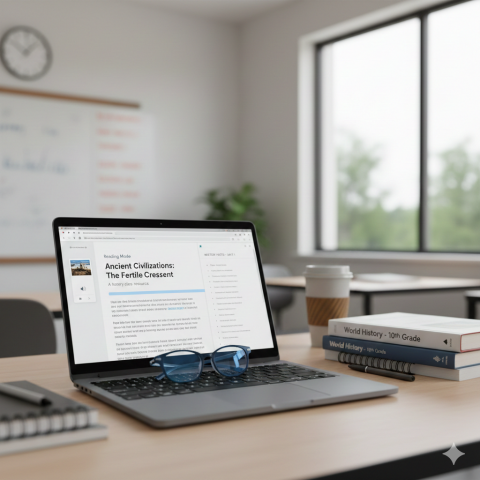
Online articles are often crowded with ads, sidebars, and autoplay videos that distract students. Reading Mode creates a simplified environment focused exclusively on the text.
Key Functionality:
Beyond stripping away distractions, Reading Mode includes a robust Read Aloud feature. Chrome can narrate the text while highlighting words in real-time, providing essential support for:
- Differentiated Instruction: Supporting students who process information better auditorily.
- Literacy Support: Helping emergent readers and ELL students connect spoken and written language.
- Accessibility: Providing a cleaner interface for students with dyslexia or visual impairments.
How to Use It:
- Right-click anywhere on a webpage.
- Select “Open in reading mode” from the menu.
- A side panel will open with the text. Use the toolbar to adjust narration speed, voice type, and text size.
Streamlining Multitasking with Split View
Managing multiple open tabs is a challenge during research or grading. Split View allows you to display two different pages side-by-side within a single browser window without the need for manual resizing.
Key Applications in the Classroom:
- Research & Synthesis: Students can view a primary source on one side and a note-taking document on the other.
- Efficient Grading: Keep a grading rubric visible on one side while reviewing student submissions.
- Lesson Planning: Reference curriculum standards while building out a slide deck.
How to Use It: There are three primary ways to activate Split View:
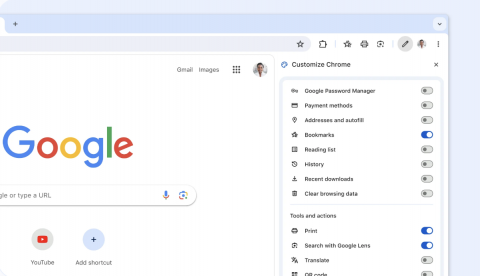
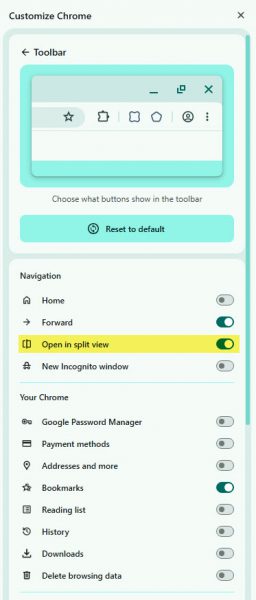
- Enable the Toolbar Icon: Click the 3 dots in the upper left corner in Chrome. Select more tools, then Customize Chrome. Enable the “Open in split view” option. This button will appear between the Refresh button and Omnibox/URL bar.
- Drag and Drop: Click and drag an existing tab to the far left or right edge of the Chrome window until a highlight appears, then release to snap it into place.
- Right-Click: Right-click any link and select “Open link in split view” to immediately view it alongside your current page.
We encourage you to try these workflows in your next lesson.