Zoom Breakout Room features and the mmhmm app

Zoom and mmhmm

Here are a few Zoom BREAKOUT ROOM reminders, a recent feature add AND an app that works within Zoom to possibly make it more engaging….

As the host of a meeting, you can still communicate and share information with participants from the main session even after you have assigned and moved participants to breakout rooms. This includes sharing your screen, sending a message, or broadcasting your mic audio to all open rooms. See this help guide to learn how to broadcast your microphone audio to all breakout rooms in a meeting. This setting is controlled separately from the broadcast message option.

The adjustment is now meeting hosts can view activity statuses of participants in breakout rooms (e.g. share screen, reactions).


If you’re a regular Zoom user, especially if working with students, and looking to enhance how you are seen in it, consider signing up for a free-to-educators premium mmhmm account (premium for 12 months, then reverts to basic version). The mmhmm app works with Zoom and lets you choose from a variety of virtual backgrounds or add your presentation slides as your background. There are also a variety of special effects that let you grow, shrink or turn yourself invisible.

from https://www.mmhmm.app/blog/mmhmm-premium-is-free-for-students-and-educators-for :

How to register as an educator (or high school student)

1. If you’re new to mmhmm, download the app and create an account. (it’s now available on Macs and Windows – and there’s even a web version.)

2. Once you have an account, or if you’ve already signed up, go to account.mmhmm.app/education and log in to your account with your e-mail and password.

3. To verify your eligibility, add your school e-mail address and tell us what you do.

4. Verify your e-mail by following the link we send.

5. Approvals can take up to five business days to complete. Once approved, your account will reflect the additional 12 months of Premium.

A couple of videos on how you might use the app.


How To Install Apps on New Dell Laptops

As of now, all instructional staff working with K-12 students should have been issued a new Dell Latitude 3520 laptop, with the exception of a few make-ups that have yet to be deployed. We appreciate everyone’s patience and want to thank staff for being cooperative, given our expedited time frame to issue all devices in the district. Even we are adjusting to the new technology and all the changes involved with the new Dell laptops. Besides the differences in the look and feel of staff laptops, one of the biggest changes is the addition of the Microsoft Company Portal.

Intune Company Portal - Apps on Google Play

What is the Company Portal?

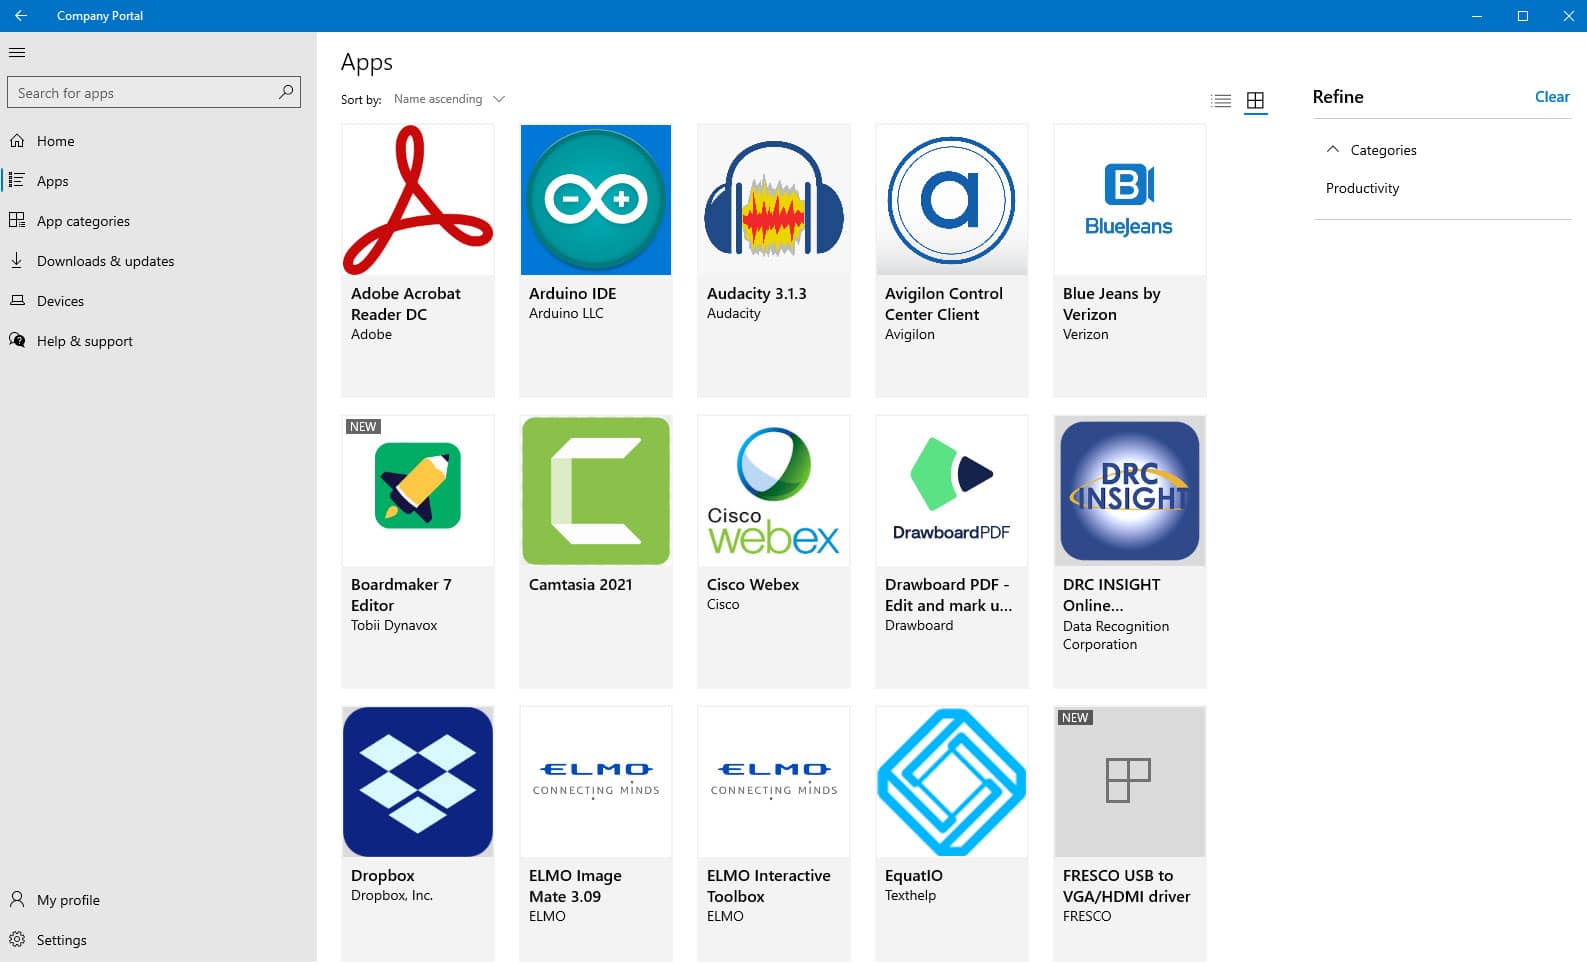
The Company Portal is part of a new data management system that allows PCCS staff to securely download and install district-vetted programs and updates. The Company Portal can be thought of as an App Store for PCCS, including all apps and utilities used in-district. We surveyed the list of programs that were being used by teachers and staff members in the district and included the vast majority of these in the current app list in the Company Portal. The list of available apps in the portal is ever-growing,

You may have noticed that installing programs outside of the Company Portal prompts for an administrator username and password. This is completely to be expected and is designed to protect your laptop and files safe from malware or malicious programs. Safeguarding devices connected to our network protects our infrastructure and makes our districts less susceptible to cyber attacks. It’s also something our insurance company has begun to insist on for us to remain with coverage.
How do I install the Company Portal on my computer?

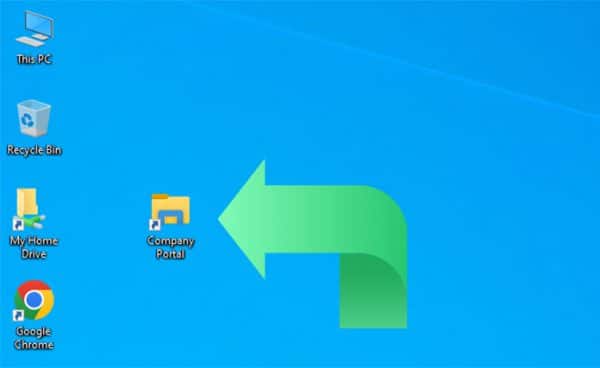
The Company Portal should install on your laptop after about an hour of initial use. Once you log into your laptop for the first time, it gets pushed out to your device and usually takes about that long to appear. Once installed, and following another restart, a shortcut to the Company Portal should later appear on your desktop. If you do not see an icon for Company Portal, it’s possible that it hasn’t been pushed to your device yet. A restart often helps, but it is also possible that you can find the Company Portal by searching for it.

If you click the Start button and begin to search for “company portal”, you should see the app populate in the search results. Once the program opens, feel free to right-click the icon at the bottom of the screen and select Pin to taskbar so it is readily accessible when you want to open the Company Portal in the future.
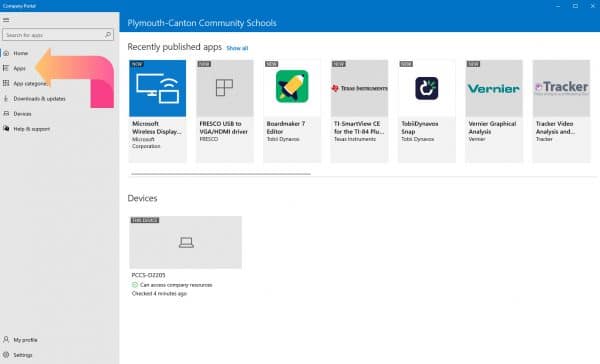
Once the Company Portal opens, click Apps to see a full list of all available apps in the Company Portal.
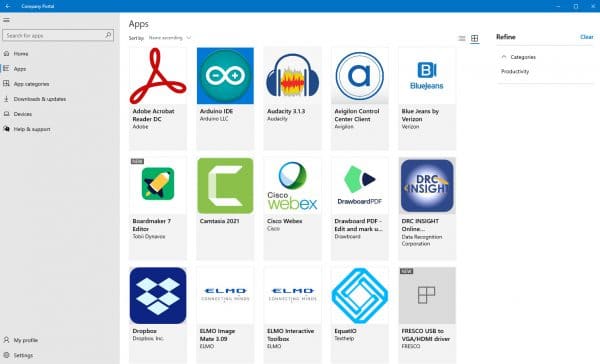
How do I install the apps I need?

Click the app you’d like to install and click Install. Please do not disconnect from the Internet or close the lid during the installation process. Some apps are larger than others and require more time to download and properly install.
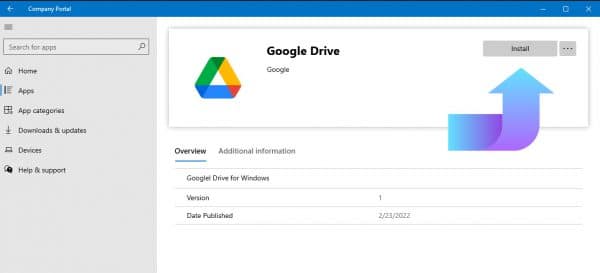
You will know an app is completely installed when you see the blue checkmark and Installed at the top of the screen.

Should I install everything in the Company Portal?

There is no need to install all available apps in the Company Portal. If you have a specific software need, there is likely an app added to the library to meet that need. See the table below for some examples.

To use: Install these apps:
Smart Notebook software SMART Education Software

SMART Product Drivers

Microsoft Office Microsoft 365 Apps for Windows 10

Please note, if it is a paid app or subscription service (and some of them are), and you don’t have the license for it, you won’t be able to run it even if you do install it.


There is software I would like to use and it’s not available in the Company Portal. How can I install it?

If there is software you’d like to use and it provides educational value, you can request to have it added into the Company Portal. Please click here to submit a tech request and choose Computer Software Request. We will gladly evaluate the request and add it to the Company Portal if it is something Teaching and Learning and/or the Technology Department deem educationally valuable for staff members.


I still don’t see the Company Portal on my laptop. What do I do?

If you don’t see the Company Portal, even after searching for it, it may be due to a setting tied to your logon profile. Please submit a tech request and let us know so we can look into it!


Have any questions?

If you have any questions about how the Company Portal works or need help setting up any apps, please submit a tech request and a member of our department would be happy to help you.


Microsoft Office 365 Now Available for Instructional Staff on New Dell Laptops

MS Office 365

We are very excited to announce that, starting today, all P-CCS instructional staff with a new Dell laptop are now able to access Microsoft Office 365. Prior to today, only a limited number of staff had access to Microsoft Office. Now, all instructional staff with a new Dell laptop can access the web version of Office 365 and/or install it on their new district laptop.

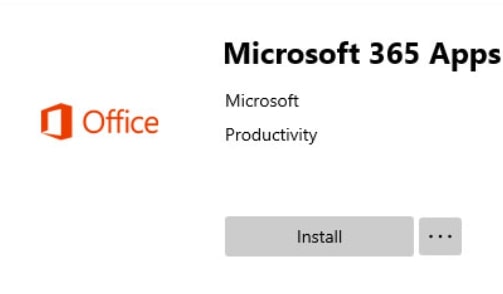
To install Microsoft Office 365, simply open the Company Portal, select Microsoft Office 365, and click install. For more detailed directions, please follow these step-by-step instructions.

As a reminder, please be patient while software is installed through the Company Portal. If you are logging into your laptop for the first time, the initial setup of your laptop (including the install of the Company Portal) can take up to 2 hours.

Additionally, students do not have access to Microsoft Office 365 through P-CCS, so please be sure to provide documents in a format that is compatible with Google Drive.

Please note that while we are able to offer free access to Microsoft Office 365 due to our current agreement with Microsoft. Microsoft is able to change these terms at any time. While not expected, if this occurs, we would no longer be able to offer staff continued access to Microsoft Office 365 and would do our best to notify affected staff as soon as possible should we need to rescind access.

Sound issues in Zoom?

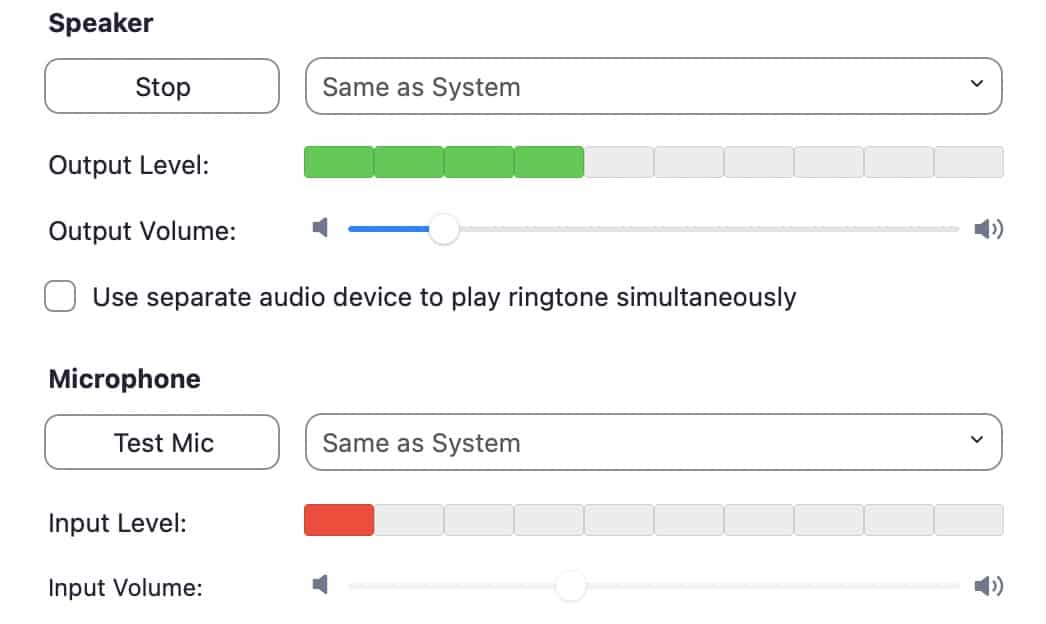
Below are a few suggestions to address sound issues you might be experiencing in a video meeting.

*** In a pinch, JOIN BY PHONE instead of COMPUTER — While continuing your video stream, if you joined computer audio automatically, you can leave the computer audio and join by phone. For visual guidance on how to either join initially by phone or transition during a meeting, see this article https://support.zoom.us/hc/en-us/articles/201362663-Joining-a-meeting-by-phone 

*** FOR WINDOWS 10 devices – Microsoft released a recent update that might resolve this issue. We recommend running the update when you don’t need your laptop for an hour or so since it takes nearly all of that time for the update to run. Make sure the laptop is plugged in. Close any open tabs/programs as well before clicking on the link below to run the update.

Please go to this link https://www.microsoft.com/en-us/software-download/windows10

Click on update now, it will download a small executable program, then run the program when it finishes downloading (should be quick) then follow the prompts to update the Windows 10 operating system.

Or you can go through the Start menu, up to PC Settings, select Update & Security, and run the 20H2 update.


*** OTHER CONSIDERATIONS

  • Make sure that the Zoom app you are running is that latest version.  Zoom does not normally update on it’s own, so this has to be done manually. See this article for guidance https://support.zoom.us/hc/en-us/articles/201362233-Upgrade-update-to-the-latest-version
  • Adjust/Disable sound processing to see if that helps.

    Adjusting sound

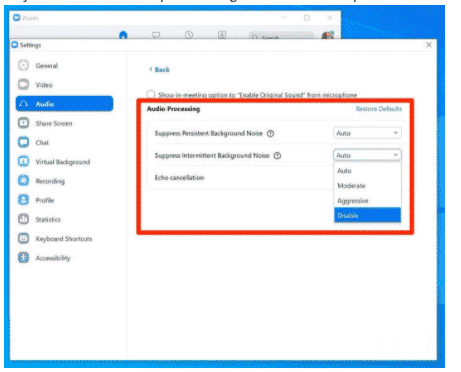
    By default, Zoom enables a suite of sound enhancements to suppress background noise. In some environments, though, these settings can make your audio choppy. If this is the case, you can disable them.

    If you’re on a PC or Mac, start the Zoom app and click the Settings icon, then click “Audio.” Click “Advanced,” and use the drop-down menus to disable the audio processing options.

    See this page for more on the steps on the disabling and a couple more tips.

P-CCS Remote Assistance Now Available Through Microsoft Quick Assist

Quick Assist

In an effort to provide faster support for staff, the P-CCS Technology Department now offers remote support through Microsoft Quick Assist. This is available for staff working either in district buildings and/or remotely. Please note that remote assistance may not be appropriate for the resolution of all issues and that our staff may still need physical access to staff equipment to provide support.

Safety and security are our top priorities, therefore, we have developed a process for offering remote support that cannot be replicated by others, such as scammers, who may want to take control of staff computers under false pretenses. Please read through our entire process below and note that 1) we will only use Microsoft Quick Assist to provide remote support and 2) we will only share the assistance code through the service ticketing system.

OUR PROCESS

  1. Upon review of certain service tickets, submitted at helpdesk.pccsk12.com, a building tech will determine remote access may help facilitate issue resolution. ……………………………
  2. The building tech will propose a day and time to provide that remote assistance using Microsoft Quick Assist (an installed Microsoft program, read more about it here), as well as ask for a best contact phone number (the tech will want to be on the phone with the staffer as they work on their laptop). Depending on the urgency and other factors, we may look to see if it is convenient to provide that assistance on the same day as the ticket is submitted. …………………………………………………………………………………………………….
  3. At the agreed upon day and time, the tech will call the staffer on the phone number provided. The staffer is expected to be able to retrieve their district email as the building tech will update their service ticket to generate an email that is sent to the staffer with a six digit code the staffer will be asked to enter on their laptop. ……………………………………..
  4. The staffer will enter that code in Microsoft Quick Assist. To do so, they must first locate and launch that program:
    1. In the bottom left corner of their Windows 10 laptop, click the Start menu
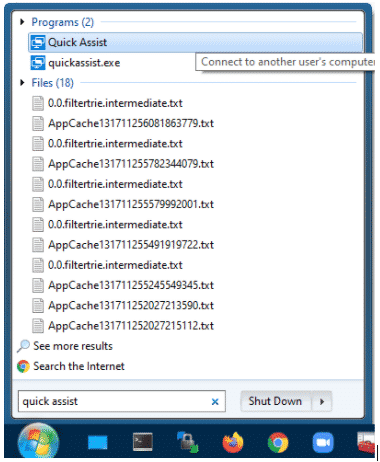
    2. In the “search programs and files” field, type “Quick Assist” and double click to open the top program result as in the picture below
    3. Quick Assist
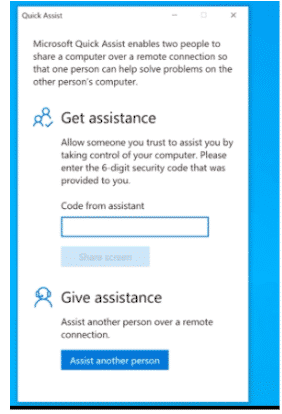
    4. When the program is launched, after being provided the code in the staffer’s email, they should copy or input the code into the “Code from assistant” field within Get Assistance and click “Share Screen”
    5. where to enter code
    6. The tech will then prompt to take control of their computer. The staffer should click “Allow” in the window that displays.

Please note: When assisting with windows laptops, our technology staff will only use Microsoft Quick Assist. Scammers will often attempt to gain access to an intended victim’s computer with other third party programs such as Teamviewer, GoToMyPC, LogMeIn, etc. The district’s technology staff will NEVER ask staff to use these services. We hope that staff will remain vigilant and turn down those who might claim to be trying to assist them, but do not follow the process we described above. We also hope that staff remember that if at any point they feel as if a computer support call is not legitimate, they should end any remote session that might have agreed to and contact our Network and Data Security Administrator via email at dan.clanceyATpccsk12.com.